Documentation Advanced Backup
Getting started
Here you will find instructions for installation, information regarding the use of the program and explanation of various terms.
Installing the program
To install the program on your computer, you need the installation application, which you can download from the download page of the software. See Download page . Please consider that you have the latest version. In particular, if you have downloaded the setup application from third-party websites. There are often very old versions are offered. Recent changes and improvement aren't included.
Run the downloaded installation file using an administrator account. This is necessary because otherwise the program won't get the rights to read the hard disk. The backup of drives and hard disks would otherwise not be possible.
After you have started the installation application, you must follow only the onscreen prompts and follow the instructions in the dialogs.
After a successful installation the program can be started and is ready for use.
User interface
First a short introduction and explanation of the technical terms of the program interface is given.
Start : Start contains backup tasks that can be created to perform regular and automatic backups.
Backup tasks can be managed, started, controlled and changed as needed.Backup : The Backup menu item lists the different types of backup that can be used to back up important files, drives, and entire disks.
Restore : All previously created backup archives are listed under the menu item Restore. These can be selected to recover contained data. In addition, further backup archives can be searched to import them into the archive management.
Events : Events are notifications to the user about changes and actions of the software. Reports of completed backups are also listed here.
Tools : Here you will find additional tools for data backup and recovery. The recovery environment can be used to restore backups made on the computer. By cloning, you can create exact copies of drives and hard drives. Thereby you can even create bootable disks in order to use them quickly in case of emergency.
Settings : The program behavior can be individually adjusted under Settings.
Overview of the program
Summarized information about the various applications and functions of the program.
The program offers a variety of functions. It includes everything you need to back up files and disks and restore the backup using a rescue medium in an emergency case. Data in the backup archive can be compressed to reduce storage requirements. To ensure the security of your data files can be encrypted using the Advanced Encryption Standard ( AES) with up to 256 bits. In addition, numerous filters can be defined to include or exclude specific files and folders from the backup.
Furthermore, the software offers the possibility to choose the frequency of automatic backup or to always manually run the backup. In addition, different storage devices can be selected for the backup. These include local hard drives, removable media, network data sharing and FTP servers.
Backups can be made as full backups or incremental backups.
Advanced notification features inform the user when backup jobs have been started, completed, or aborted due to errors. Reports document the execution of a data backup.
Basic terms
Explanation of the technical terms for a better understanding.
- Medium : A data carrier that stores Information in the form of files.
- Hard disk : The disk, which is installed in the computer.
- Drives : The parts of a disk, which are divided by partitioning.
- Data backup : A copy made from existing files, or images of hard disks and drives
- Backup archive : A file that stores a backup.
- Recovery : The process of copying back a data backup.
- Synchronize : Creating a copy of files and folders on another disk
- Cloning : Create an exact copy of a drive or hard disk (Similar to synchronization ).
- Backup destination : The place where a backup archive is stored.
- Backup source : The location from which the files are read.
System requirements
Information on necessary computer performance ( CPU, memory, disk space and disk drives) to take full advantage of the program.
For the application to run properly a computer with a 1 GHz processor, 512 MB of RAM and 500 MB free disk space is required.
Optimal: A computer with a 3 GHz processor, 2 GB memory and 1000 MB free disk space.
Tip : The more processor cores a computer has, the faster it will be a backup (even with active compression and encryption).
A CD-RW/DVD-RW drive is required to create a CD or DVD-based recovery environment.
Supported file systems and storage devices
The program supports the Windows operating system and conventional file systems. This includes NTFS, FAT16, FAT32 and exFAT. However, other file systems may be backed up with the program. This are read as raw data (RAW) with the sector-by-sector method and stored then.
The application supports many common storage media as backup destination. Backup archives can be backed up, for example, on external disks as USB flash drives, USB hard drives and external SATA drives (eSATA) or in the home network, NAS drives and FTP servers. Details about the use of these storage media, you will learn in the chapter Backup Targets.
Secure data
This chapter describes procedures and techniques for saving data. Back up your files, disks or entire hard drives in various formats.
Functioning
The Software is designed to execute a data backup not just once, but repeatedly. For this reason, backups are saved as tasks. First a new task must be created and then which data is to be backed up. In addition, you can specify how often the program starts the backups automatically. Once defined, the program works in the background and performs the backups automatically.
Where the data is backed up
You can decide where your data is stored. In each task, you can specify the directory in which the archive is to be created.
How the files are stored
The program creates archives in which all the files will be stored. The files can also be backed up to folders so that they are quickly available at all times.
Differences in the data backup
How do the individual backup types differ from each other? The software provides different methods for making backups.
The way the files are backed up depends on the backup type. Basically, all selected files are backed up, even if they are used. Shadow Copy Service also backs up locked files.
The following options are available for selection:
- Complete PC backup : It backs up all the files and drives that are on the computer. Portable data carriers are excluded from the data backup.
- Files and Folders : When backing up files and folders, the files and all attributes are backed up. Optionally, access rights can also be included in the data backup.
- Drive backup : When backing up hard disks and drives, exact images of the hard disks, drives and partitions are created. These includes, in addition to the files, additional data from the file system and the boot sector . This includes the partition table and all files for starting the computer.
As a basis of file and folder backup, the file backup is used, in which all the file contents are completely read and stored in an archive. In addition to the content of the data, additional information such as the creation and modification date of the file, as well as security settings and a checksum are also stored.
In the hard disk and drive backup images are created from hard disks and drives, which are necessary to restore a drive or disk image.
Backing up a drive backs up additional data such as security settings, the file system tree, and the boot record that is essential to booting the operating system. (Temporary data, such as the paging file : "pagefile.sys", And the file for the hibernate : "hiberfil.sys", Are generally not included in the backup, since these are not necessary for the restoration process. They occupy too much space. )
When backing up a hard drive, all the drives and partitions contained on the hard drive will be saved. Including the associated MBR or GPT partition table and Master Boot Sector (MBR), which contains the information about starting the computer.
Frequency
Eine Backup-Aufgabe kann einmalig eingerichtet und ausgeführt werden. Zusätzlich kann für eine Backup-Aufgabe festgelegt werden, dass diese wiederholt im vorgegebenen Intervall von Stunden, Tagen oder Wochen ausgeführt wird. Letztendlich kann der Start einer Backup-Aufgabe auch durch festgelegte Ereignisse ausgelöst werden.
Übersicht der Zeitsteuerung
Übersicht der Konfigurationsmöglichkeiten für die Häufigkeit der Ausführung einer Backup-Aufgabe.
- Manually : Die Backup-Aufgabe wird von der Software nicht automatisch ausgeführt, sondern nur beim manuellen Start durch den Benutzer.
- Interval : Beim Intervall wird die Backup-Aufgabe in einem vom Benutzer vorgegebenen Minuten- oder Stunden-Intervall automatisch wiederholt gestartet. Wird die Option zum Zurücksetzen des Intervall-Zählers bei einem Neustart des Computers aktiviert, dann wird eine Backup-Aufgabe nicht sofort nach dem Hochfahren des Computers ausgeführt, sondern erst nachdem der Computer die angegebene Intervall-Dauer gelaufen ist.
- Daily : Die Backup-Aufgabe wird täglich einmalig zur angegebenen Uhrzeit ausgeführt. Ist der Computer zur angegebenen Uhrzeit ausgeschaltet, dann wird die Backup-Aufgabe ausgeführt, sobald der Computer das nächste Mal wieder hochfährt.
- Weekly : Bei der wöchentlichen Wiederholung kann festgelegt werden, an welchem Wochentag die Backup-Aufgabe zur vorgegebenen Uhrzeit ausgeführt werden soll. Im Auswahlfeld können auch mehrere Wochentage markiert werden. Dann wird die Backup-Aufgabe auch an den ausgewählten Wochentagen ausgeführt. Ist der Computer zur angegebenen Uhrzeit oder am angegebenen Wochentag ausgeschaltet, dann wird die Backup-Aufgabe ausgeführt, sobald der Computer das nächste Mal wieder hochfährt.
- Monthly : Bei der monatlichen Wiederholung kann festgelegt werden, an welchem Tag im Monat die Backup-Aufgabe zur vorgegebenen Uhrzeit ausgeführt werden soll. Im Auswahlfeld können auch mehrere Tage eines Monats markiert werden. Dann wird die Backup-Aufgabe auch an den ausgewählten Tagen eines Monats ausgeführt. Ist der Computer zur angegebenen Uhrzeit oder am angegebenen Tag ausgeschaltet, dann wird die Backup-Aufgabe ausgeführt, sobald der Computer das nächste Mal wieder hochfährt.
Backup-Ausführung beim Ereignis
Übersicht der Konfigurationsmöglichkeiten für die Häufigkeit der Ausführung einer Backup-Aufgabe.
- System start : Die Backup-Aufgabe wird von der Software automatisch ausgeführt, sobald sich der erste Benutzer auf dem Computer anmeldet. Um das Hochfahren des Betriebssystems durch die Ausführung der Backup-Aufgabe nicht zu verzögern, kann eine Wartezeit vor der Ausführung angegeben werden. Zusätzlich kann ein Intervall zwischen zwei aufeinanderfolgenden Ereignissen angegeben werden, damit Backup-Aufgabe nicht zu häufig nacheinander ausgeführt wird.
- Shutdown : Vor dem Herunterfahren wird die Backup-Aufgabe gestartet und das Herunterfahren des Computers solange verzögert, bis die Backup-Aufgabe beendet ist. Zusätzlich kann ein Intervall zwischen zwei aufeinanderfolgenden Ereignissen angegeben werden, damit Backup-Aufgabe nicht zu häufig nacheinander ausgeführt wird.
- USB-Datenträger anschließen : Beim Anschließen eines vorgegebenen USB-Sticks wird die Backup-Aufgabe gestartet. Zusätzlich kann ein Intervall zwischen zwei aufeinanderfolgenden Ereignissen angegeben werden, damit Backup-Aufgabe nicht zu häufig nacheinander ausgeführt wird.
- Neues Laufwerk anschließen : Wird ein neues Laufwerk an den Computer angeschlossen, dann wird die Backup-Aufgabe ausgeführt. Zusätzlich kann ein Intervall zwischen zwei aufeinanderfolgenden Ereignissen angegeben werden, damit Backup-Aufgabe nicht zu häufig nacheinander ausgeführt wird.
- Leerlauf : Sobald das Computersystem im Leerlauf ist, wird die Backup-Aufgabe gestartet. Der Leerlauf entsteht, wenn über einen Zeitraum von über 5 Minuten die Prozessorauslastung des Computers unter 5% war. Zusätzlich kann ein Intervall zwischen zwei aufeinanderfolgenden Ereignissen angegeben werden, damit Backup-Aufgabe nicht zu häufig nacheinander ausgeführt wird.
- Programm beendet : Sobald das anhand des Dateipfades ausgewählte Computerprogramm beendet wurde, wird die Backup-Aufgabe gestartet. Zusätzlich kann ein Intervall zwischen zwei aufeinanderfolgenden Ereignissen angegeben werden, damit Backup-Aufgabe nicht zu häufig nacheinander ausgeführt wird.
Advanced options
Ergänzend zu der vorangehenden Konfiguration, können optional zusätzliche Bedingungen aktiviert werden.
Run backup only when computer is idle
Im Allgemeinen wird eine Backup-Aufgabe sofort gestartet, sobald die vorgegebene Zeit oder das ausgewählte Ereignis eintritt. Damit die Ausführung der Backup-Aufgabe das Computersystem nicht überlastet, wird durch diese Option die Ausführung hinausgeschoben, bis das Computersystem einen Leerlauf-Zustand erreicht. Ein Leerlauf liegt vor, wenn die Prozessorauslastung unter 5% liegt.
Prevent hibernation while backup is running
The software prevents the computer system from switching to sleep mode while a backup task is being processed. Nach der Ausführung kann das Computersystem regulär in den Ruhezustand wechseln.
Execution delay after system start by 5 minutes
Beim Hochfahren des Computers werden viele Programme ausgeführt. Diese Option verzögert die Ausführung einer Backup-Aufgabe nach einem Systemstart um fünf Minuten, um die Benutzerinteraktion nicht zu stören.
Backup scheme Backup strategy
The software offers three types of backup.
- The first type is a full backup. Each time the backup, all files are scanned completely and saved in an archive.
- The differential backup performs a full backup the first time. With each subsequent call only the new files are saved, which are not already in the archive.
- Incremental backup performs a full backup when executed for the first time. But after that all files are saved with each call that have changed since the last execution or add. This makes backing up the files much faster and saves space.
After what pattern runs a backup?
How a backup is created and what pattern consecutively executed backups follow, is described as a backup scheme or backup strategy. The program distinguishes between three schemes:
- Full backup
- Differential Backup
- Incremental Backup
Full backup
In a full backup a newly created task will be launched and begins to processed each file until it has back up all files in a backup archive. A new backup archive (corresponding to the selected file name for the backup archive) is created for each new startup.
- To do this, create a corresponding file backup with the file name "My first backup". For the backup archive, select the drive (D:) as the backup target and then start the first data backup.
- The program creates a backup archive with the name "My first backup f0" in the drive (D:).
- Each re-run of the backup produces a new backup file : "My first backup f1", then "My first backup f2", "My first backup f3" , .....
- Each of these archives includes a copy of your important files at a time.
Differential Backup
The situation is different with differential backup. Here, the current files on the computer are compared with the last full backup, and found changes are to be saved in a differential backup archive. If one of the new files is not yet included in the previous backup or if it has been changed in the meantime, the file will be added to the new backup archive. Thus, a new differential backup archive is always created, which complements the previous full backup archive.
- For this, you create a corresponding file and folder backup with "My First Backup" as the filename.
- For the backup archive, select drive (D:) as the backup destination and start the first backup on Sunday.
- The program creates, according to your settings, a backup archive with the name "My first backup f0_d0" as a full backup in the drive (D:).
- The next time the backup is run on Monday, the old backup archive of full backup "My first backup f0_d0" will be opened and compared with your documents. Does a document has been changed in the meantime, it is stored in the new differential backup archive "My first backup f0_d1". Thus, the backup archive "My first backup f0_d1" contains all changed files since Sunday.
- This process is repeated until the number of incremental backups has been reached.
- After the specified number of backups have been created, is again carried out with a new full backup, and the process described above is repeated again.
Illustration
| Sunday | Monday | Tuesday | Wednesday | Thursday | Friday | Saturday | Sunday |
|---|---|---|---|---|---|---|---|
| Full backup | Differential | Differential | Differential | Differential | Differential | Differential | Full backup |
| All Files | Only Changes since Sunday |
Only Changes since Monday |
Only Changes since Tuesday |
Only Changes since Wednesday |
Only Changes since Thursday |
Only Changes since Friday |
All Files |
Incremental Backup
However, we recommend the incremental backup: This, similar to the differential method that ensures not only new and changed files since the last full backup, only new and changed files are backed up since the last incremental backup. After the initial full backup, an incremental incremental backup is performed and the new or changed files are added.
- For this, you create a corresponding file and folder backup with "My First Backup" as the filename.
- For the backup archive, select drive (D:) as the backup destination and start the first backup on Sunday.
- The program creates, according to your settings, a backup archive with the name "My first backup f0_i0" as a full backup in the drive (D:).
- The next time you run the backup on Monday, the old backup archive, the full backup, will open "My first backup f0_i0" and the files compared are with your documents. Does a document has been changed in the meantime, it is stored in the new incremental backup archive "My first backup f0_i1".
- The next time the backup is run on Tuesday, the old backup archive of the last incremental backup from Monday "My first backup f0_i1" will be opened and compared with your documents. Does a document has been changed in the meantime, it is stored in the new incremental backup archive "My first backup f0_i2".
- This process is repeated until the number of incremental backups has been reached.
- If you start the backup again, a new full backup is executed. The process described above is repeated from the beginning.
Illustration
| Sunday | Monday | Tuesday | Wednesday | Thursday | Friday | Saturday | Sunday |
|---|---|---|---|---|---|---|---|
| Full backup | Incremental | Incremental | Incremental | Incremental | Incremental | Incremental | Full backup |
| All Files | Only Changes since Sunday |
Only Changes since Monday |
Only Changes since Tuesday |
Only Changes since Wednesday |
Only Changes since Thursday |
Only Changes since Friday |
All Files |
Retention of backups
You can specify the Software, how long is a backup or an entire backup set should be kept. You can use the option in the backup settings.
- 1. Week : Backup Set 1 On the hard drive 1 : On Monday, the first full backup and Tuesday to Saturday an incremental backup.
- 2. Week : Backup Set 2 On the hard drive 1 : On Monday, the second full backup and Tuesday to Saturday an incremental backup.
- 3. Week : Backup Set 3 On the hard drive 1 : On Monday, the third full backup and Tuesday to Saturday each incremental backup. Now backup set 1 is deleted, backup set 2 is retained.
- 4. Week : Backup Set 4 On the hard drive 1 : On Monday, the fourth full backup and Tuesday to Saturday, incremental Backups. Now backup set 2 is deleted, backup set 3 is retained.
- ....
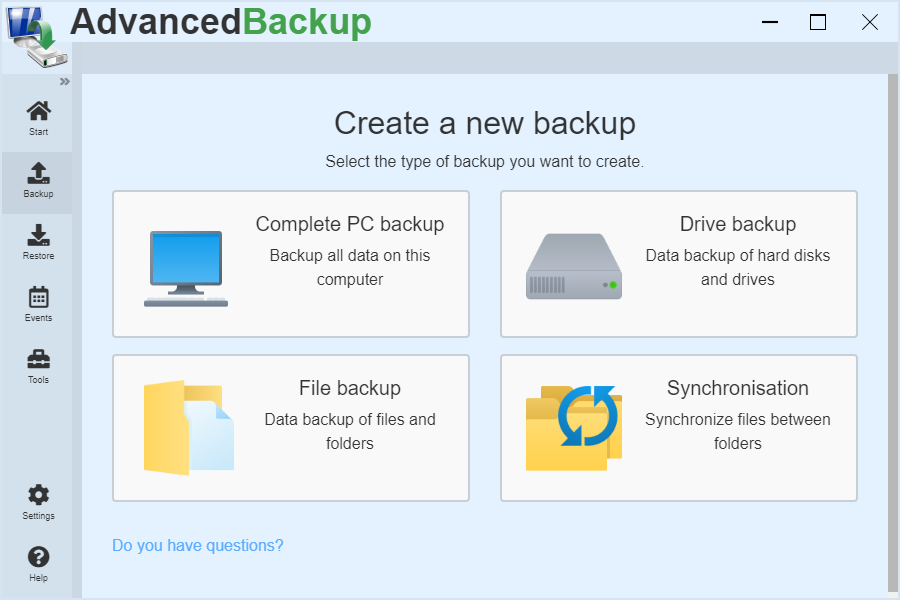
Computer backup
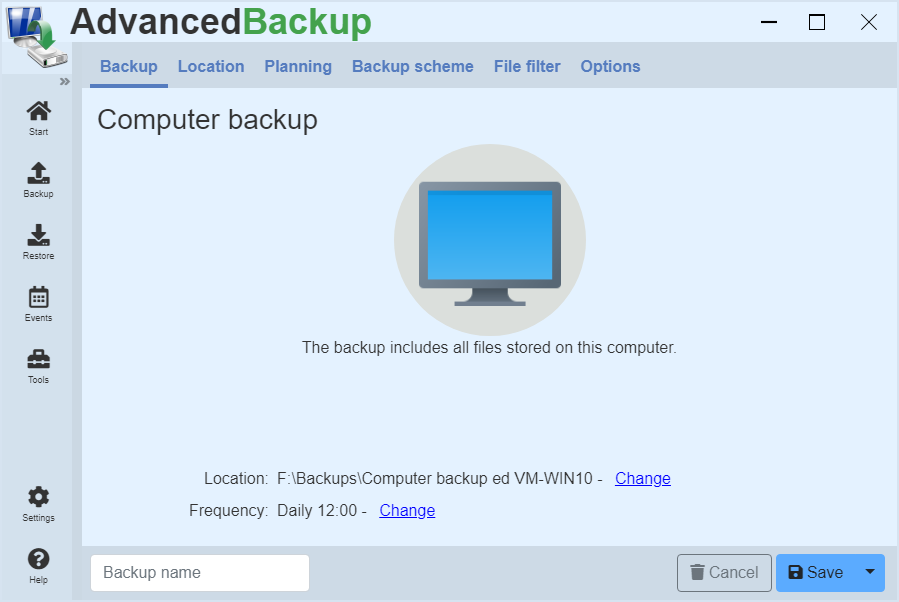
The computer backup includes all files on the computer. Not only the files are backed up, but also the operating system and the associated data for the startability of the computer. A computer backup can consume a corresponding amount of disk space. Use a large data carrier on which the backup archive is stored.
File backup
How to create a new task to back up files and folders.
How can you create a new backup?
Creating a new backup is easy.
- Start the program or open the program interface.
- Go to main menu click on menu item: Backup
- Click on in the displayed overview: File backup
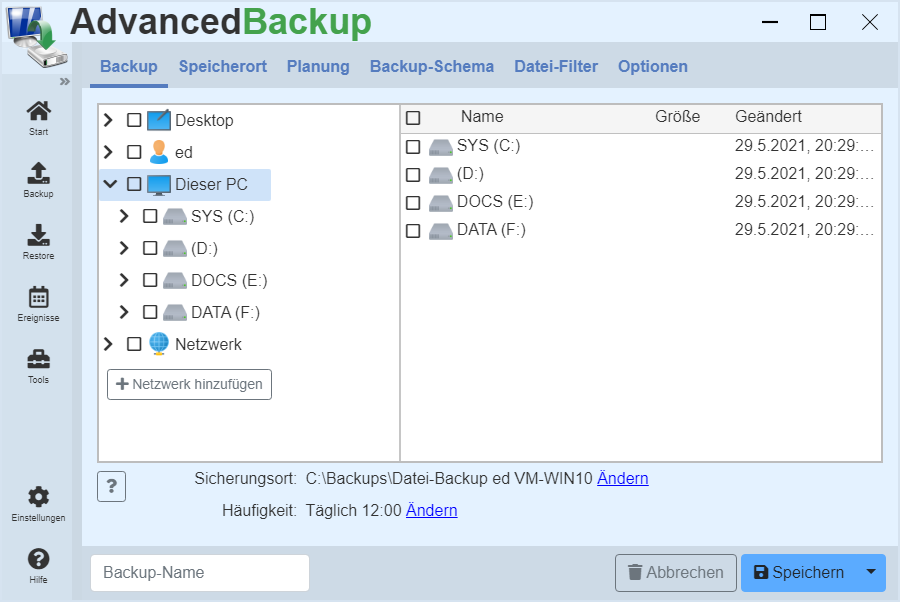
Backing up files allows you to select specific files that are important to you and you want to have backed up regularly.
- Start the program or open the program interface.
- Go to main menu click on menu item: Backup
- Click on in the displayed overview: File backup
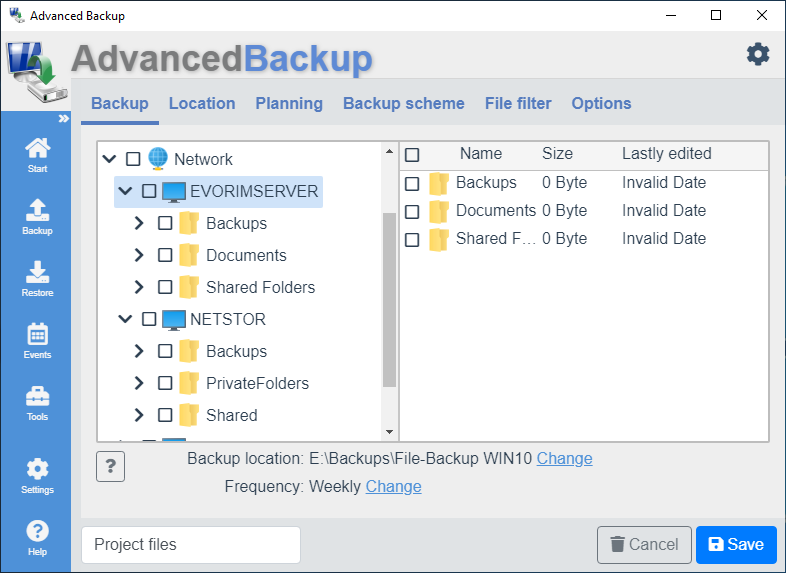
- In the new view, the directories on the left of the computer and the files in a directory on the right are displayed. Through this structure you can navigate through the folders.
- Click through to the desired files and put a mark in front of the files, or at will, in front of a folder you want to backup.
- Thereby you set which files should be included in the backup.
- After you have marked all files to back up, select under `backup location` the directory where the backup archive will be stored.
- A line below, select the frequency of backup and the backup scheme.
- Now you need to assign a name for the task.
- Now you can save the backup.
- The newly created backup appears in the task list and can be started.
- Click on to do this: Start backup
Create a backup of drives
Instructions for creating a backup task for backing up drives.
How can you create a new backup of drives?
Creating a new backup is easy.
- Start the program or open the program interface.
- In the main menu, go to the menu item Backup.
- The drive backup must then be selected.
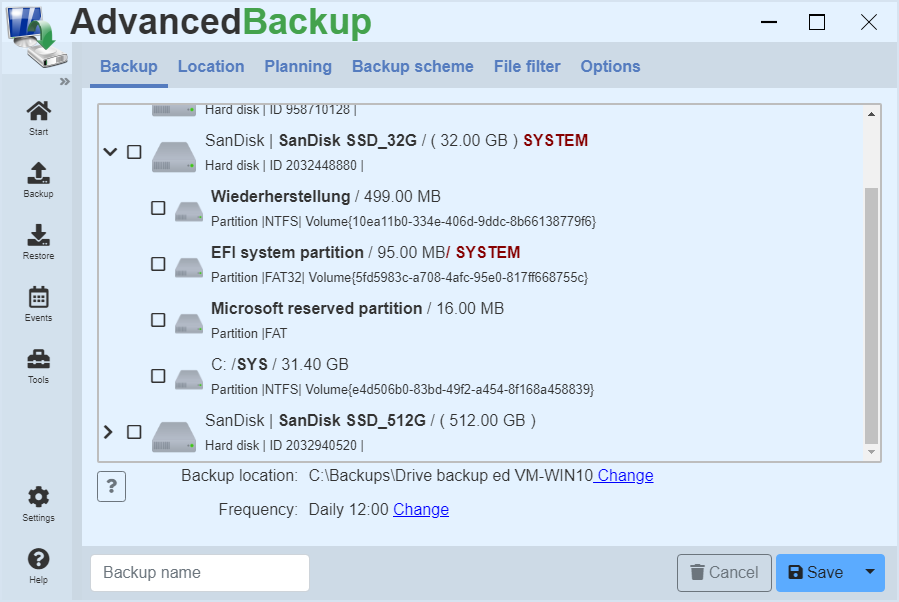
- Then a list appears with all connected hard disks and drives on the computer.
- By setting the checkbox the drive for the data backup is marked.
Hard disks can be opened with the arrow icon to display the associated drives and partitions.
A backup of the drives allows the selection of drives you want to have backed up regularly.
Instruction
- On the Backup menu, click Disk Backup.
- A list of all hard disks and drives on the computer appears.
- Select the checkbox to select a hard disk or drive. This will include this drive in the backup.
- After you have selected all drives to be backed up, select the directory in which the backup archive is to be stored under backup location.
- Finally, a plan for automatic data backup can be defined.
- Now you need to assign a name for the task.
- Now you can save the backup by clicking the Save button.
- After saving, the task appears in the task list and can now be started.
System backup
System disk backup and disaster recovery.
If you want to back up a complete operating system to recover it in an emergency with all system and boot files, you will need a disk backup that includes all the necessary information. This saves all files located on the hard disk and partition table and the boot sector. All this is necessary so that the operating system works correctly after a restore.
To recover a hard disk backup in the event of an emergency (such as hard disk failure), you need a recovery environment on a disk. See: Recovery environment .
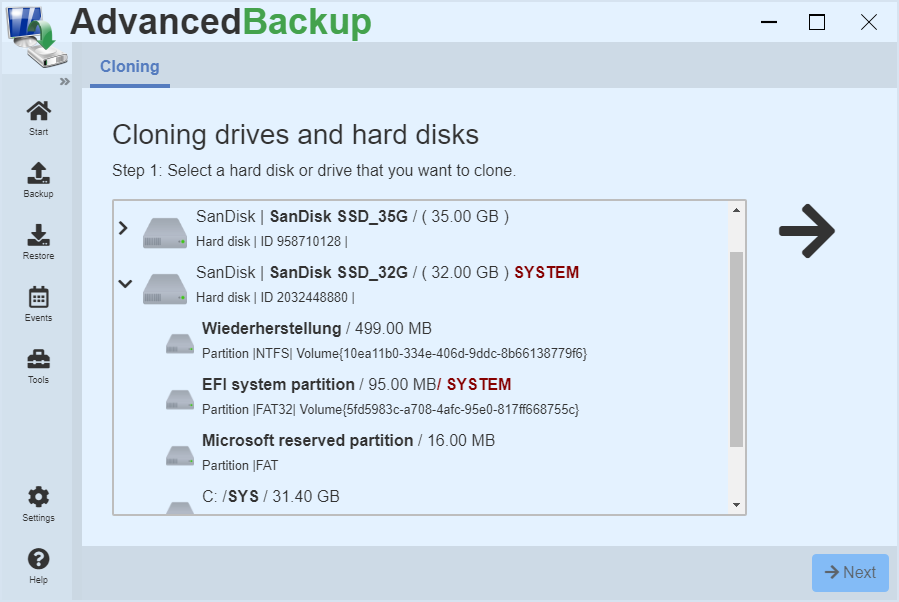
How do I recognize the hard drive with the operating system?
The drive backup view lists all hard disks connected to the computer. The system hard disk is shown with the Windows logo and additionally with the SYSTEM marking. This hard disk you have to include in the system backup.
Recovery
In the event of data loss, hard disk failure, or defect, you can easily restore the backup to any hard drive using the recovery environment. The new hard disk can be equal to or even greater than the former. The new hard disk also does not need to be partitioned or formatted beforehand. In case of recovery the program creates all necessary partitions and also creates the old boot sector.
FAQs
Can I restore a bootable system by backing up individual partitions?
Because of the way Windows is distributed and starts, often the recovery of a single drive alone not sufficient. Because Windows is not only located on the drive on which the Windows folder is, but also on small invisible partitions, which are also used for the launch of Windows. For experienced users who know exactly which devices are needed for a bootable Windows, a drive backup to create a bootable backup is offered. As an experienced or a beginner user, you should always backed up hard disk.
Executing a data backup
Once you have created a new backup, it will appear in the task list. Then click Start backup and the backup will be added to the queue. The software processes only one backup task at a time so that the processor is not overloaded and work on the computer is still possible.
How can I restart a backup later?
Have you created a new backup, you can start it later again.
Instruction
- Start the program or open the program interface.
- Go to main menu click on menu item: Start
- A list of all backup tasks will then appear
- Then click Start backup and the backup will be added to the queue and automatically processed one after the other.
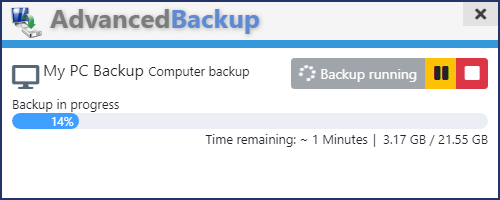
How can I monitor a running backup?
If you have just started a task manually or if it was started automatically, you can monitor its progress.
Instruction
- Start the program or open the program interface.
- Go to main menu click on menu item: Start
- Then a list with all tasks appear
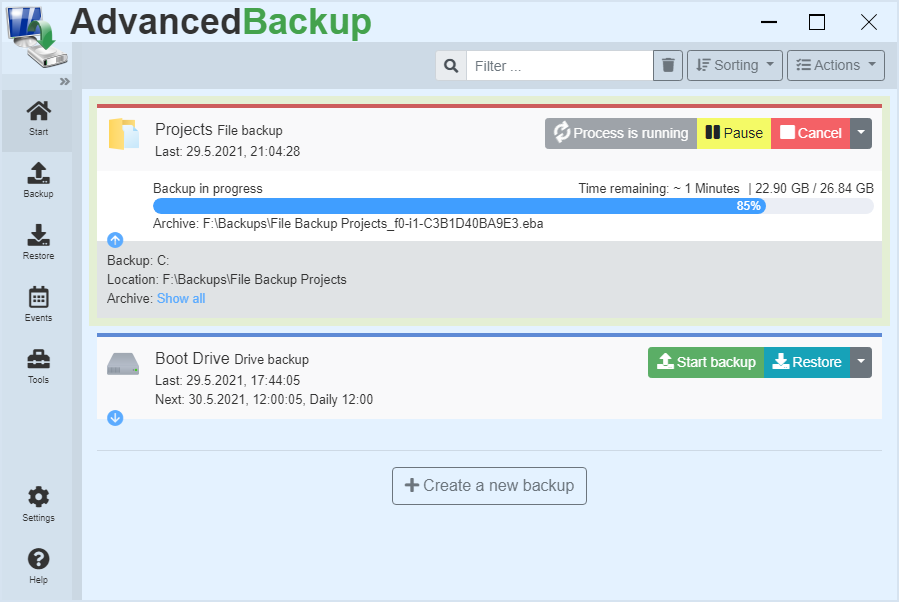
- A progress bar shows which task is being executed and how long it will take.
Where can I see how long a backup will take?
Current data backups are highlighted in the task list. The remaining time is displayed above the progress bar.
How can I stop an ongoing backup?
Current data backups are highlighted in the task list. In addition, the buttons for pausing and canceling the backup appear.
Backup Targets
The following is an overview and description of the various options for archiving a data backup.
Where can I store a backup archive?
You have several options for archiving a backup. The application supports many common storage media as backup destination. Backup archives can, for example, on external disks as :
- USB-pen ,
- USB hard drives And
- External SATA drives (eSATA) or in
- Home network , On
- NAS drives And
- FTP servers are backed up.
The easiest way to store a backup is an attached hard drive.
It is important to note that the backup archive is stored on a different hard disk than the origin of the data in the backup. The hard disks that are connected to the computer, are provided through a drive. This can be addressed by "Backup location", "Local folder", by using the "Browse" button to select the location.
External disk
A much better approach is to store its backup to an external USB hard drive or USB stick.
The USB disk attached to the computer is also provided via a drive. You can specify this path under "Backup location", "Local folder" by using the "Browse"-button.
Network
Eine weitere zuverlässige Methode ist die Datensicherung im Netzwerk.
Here you can store data in the network in two ways. : You can include a network drive in your workplace and address the network drive as a local folder (see above). Alternatively, you can directly access a network file share by selecting the network as the backup destination and specifying file sharing on a server on the local network. (Example : "\\Server\File sharing \Backups") If necessary, you can set a username with a password if it is a protected network share. Keep in mind that network shares are often slower than hard drives and therefore the backup will be slower.
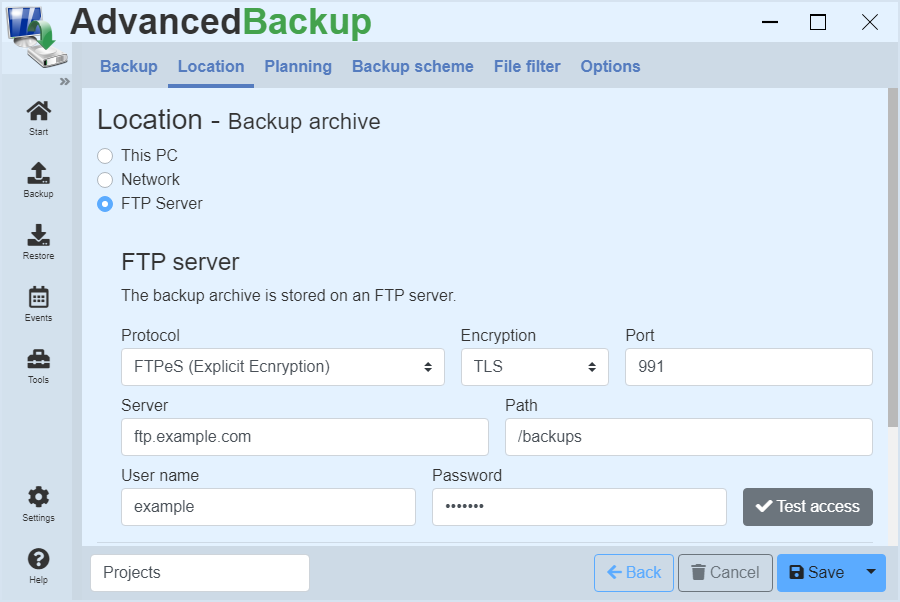
FTP server
Also secure, but very slowly is the FTP server.
The application supports connections to FTP-enabled devices, such as NAS FTP server in the intranet or the FTP server on the Internet. For devices that are permanently in operation, an FTP backup is not a problem. Computers that are only in operation for a short time have problems uploading the files, because a prompt shutdown cancels an upload and has to restart it later.
Add the following programs to the exception:
- backupsvc.exe
- advbackup.exe
Enable the following ports for the FTP protocol:
- FTP: 21, 20
- FTPS: 989, 990
- SFTP: 22
The archive formats
In the following, the backup archive formats used are presented and the advantages and disadvantages are shown and compared with each other.
Backup File Archiv
The backup archive of this software for data backups is "Backup File Archive". This file format is indicated by the extension (*.bfa). This archive format offers many advantages over other archive formats such as (*.zip) in terms of speed, extensibility, encryption and modification. In addition to the strong AES-256 encryption and the archive splitting, this archive supports three different compression algorithms. Furthermore, this archive format also backup security policies and alternative data stream (ADS), which the ZIP-archive can not.
Advantages
- Strong encryption : AES-128, AES-192, AES-256
- Multithread-safe: The more processors, the faster
- Good scalability
- Backup of security policies , Alternative Data Streams (ADS)
- UNC-Paths : Supports paths of length up to 32000 characters
- Supports Unicode file names: Also other characters such as Chinese and Cyrillic
- Incremental backup by linking the archives
- Faster Writes through async and buffer technique
- Maximum file size : 137.438.953.471 GB
- Splitting: Archives can be divided into small files
- Accepts network paths.
Disadvantage
- Can only be read by this software
This format can only be opened with Advanced Backup. Therefore, it is recommended to keep a copy of the installation file, to enable restoring from this archive format in case of emergency.
ZIP Archive / Zip64
Advantages
- This format can be opened by other programs
- Encryption : Crypto And AES-256
- UTF-8 encoding: Also other characters such as Chinese and Cyrillic
- Splitting: Archives can be divided into small files
- Accepts network paths.
Disadvantages
- Only Deflate as compression algorithm
- Higher CPU load due to old compression algorithm
- No UNC paths: Path length is limited to 260 characters
- Can not backup security policies and Alternative Data Stream (ADS)
The Zip64 archive is an extension of the ZIP archive, which repeals the restriction on the maximum file size of 4 GB.
Backup Disk Image
The "Backup Disk Image"-format is designed to store images of disks in a file. This file format is indicated by the extension (*. bdi). It has the advantage that you can thus save hard disks incrementally. Thus the individual archives refer to each other and save only the change that is not contained in the last archive. This makes the archive more stable. In addition, this format is multithreaded, so you can reach a higher speed in backup. In addition to extras such as a strong AES-256 encryption and archive splitting, this format supports three different compression algorithms.
Advantages
- Strong encryption : AES-128, AES-192, AES-256
- Multithread-safe: The more processors, the faster
- Incremental backup by linking the archives
- Faster Writes through async and buffer technique
- Maximum file size : 137.438.953.471 GB
- Splitting: Archives can be divided into small files
- The backup archive can be included as a drive in My Computer and the drives can be searched.
Encryption
The program supports AES encryption in three variants with 128, 192 and 256 Bits in length.
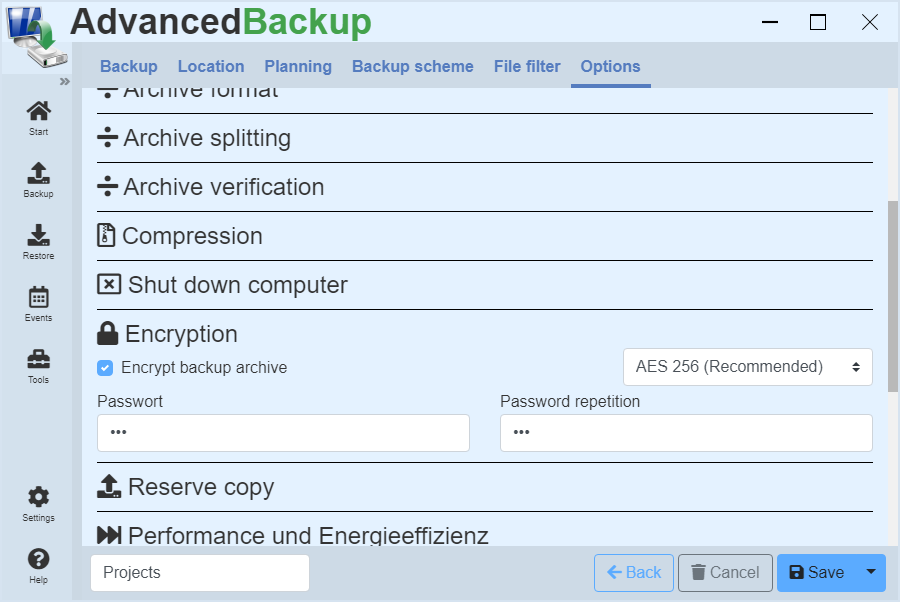
You can activate encryption by performing the following steps:
- Create a new backup or edit an existing one.
- Click on the entry in the upper register menu: Options
- Click on the title: Encryption
- An input mask opens.
- Activate the checkbox: Encrypt backup archive
- Enter the password twice.
Each time you change the password or enable encryption, a new full backup archive is started.
Edit task
You can subsequently edit a task that has already been created and change the settings it contains. Follow the steps below:
- Start the program or open the program interface.
- Go to main menu click on menu item: Start
- Find the task you want to edit.
- Click on the last gray button in the command bar. A drop-down menu opens.
- Then click on edit in the menu.
The view opens as it did when you created the task. After you have made all your changes, you can save it again.
Backup to the network
The following section deals with backing up data on the network and using protected network shares.
The network as the source
Zum Datensichern von Netzwerkfreigaben müssen Sie eine Datei-Backup erstellen. In the directory tree navigate via the network entry to the desired network path.
Add network shares
If network shares are missing in the directory tree, you can add them. Click on the button to do this: Add network share
The network as a target
If you want to save a backup of local files and folders on the network, you have to select the network as the destination and enter a network share address manually (For instance :
\\Server\MyShare ).
In addition, you can also specify a folder in which the backup should be stored (For instance : \\Server\MyShare \Backups).
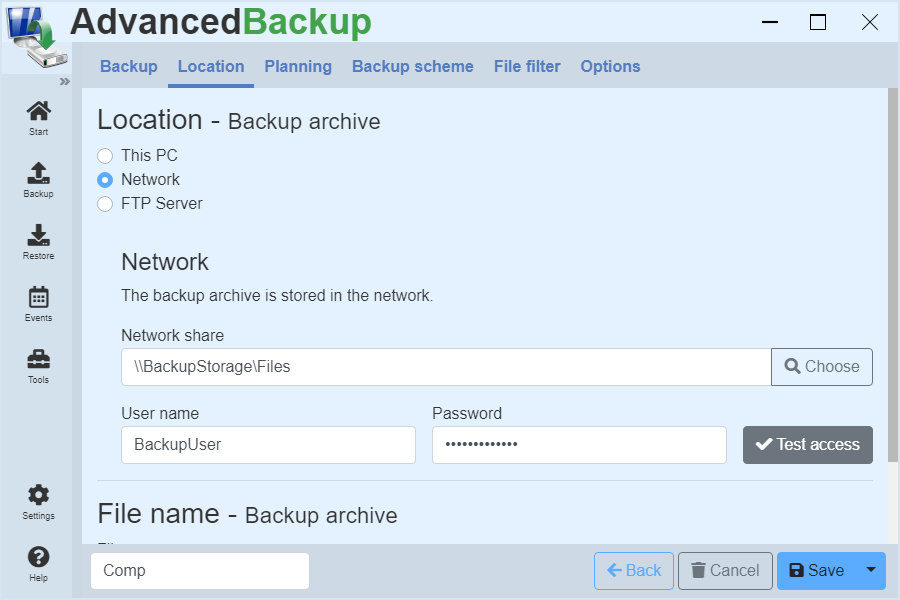
Secured network - authentication
To use a protected network share, enter the user name and password for authentication in the text boxes under the network destination.
Example
- Sie haben einen Netzwerk-Speicher mit Namen : BackupServer
- Das Benutzerkonto John ist auf dem Server angelegt.
- Sie greifen mit dem Windows Datei-Explorer auf die Netzwerkfreigabe \BackupServer\FileShare mit Benutzerkonto John zu.
- Anschließend versuchen Sie mit der Backup-Software auf die Netzwerk-Freigabe \BackupServer\FileShare ebenfalls mit Benutzerkonto John zuzugreifen.
- Da die Backup-Software in einem anderen Sicherheits-Kontext läuft, verhindert Windows den Zugriff.
Solution
- Erstellen Sie auf dem BackupServer einen neuen Benutzer mit Namen BackupUser.
- Für den Zugriff aus Backup-Software auf die Netzwerk-Freigabe \BackupServer\FileShare nutzen Sie einfach den neuen Benutzer BackupUser.
Problem solution
Not all of the network shares are displayed in the program
Place missing network shares in the program just for yourself:
- Create a file backup
- Click on "Add network share"
Notifications
The program supports various notifications that you can turn on or off. All settings can be found under the menu item Options, then Notifications.
You can activate various notifications by performing the following steps:
- Create a new backup or edit an existing one.
- Click on the entry in the upper register menu: Options
- Click on the title: Notifications
- A list of different options opens.
- Activate the checkbox: Show backup progress in a small notification window
Notification window
The notification window is the small window at the bottom right. This appears when a task is started. You can specify individually for each task whether this notification window is displayed. The settings can be found under the menu item Options, then Notifications.
The beginning and end of a backup
The program notifies you when a task begins or ends. These notifications appear at the lower right edge. You can set for each task, whether these notifications will be displayed. The settings can be found under the menu item Options, then Notifications.'
Ask for permission before execution
The program notifies you when a task is to begin. A notification window appears at the bottom right corner. You can decide whether the backup task can start immediately or must be temporarily suspended. If a backup task is suspended, it is restarted at the next regular appointment. The settings can be found under the menu item Options, then Notifications.

Email notification
With the help of e-mail notifications, you can inform yourself and others about the success of your data backups, even beyond the intranet. Also multiple receivers are possible.
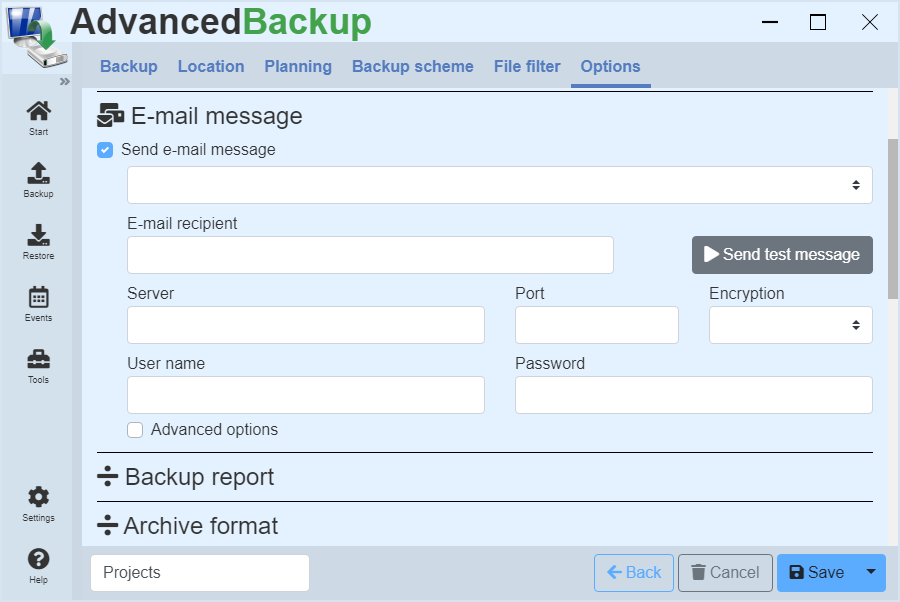
You can activate this function by performing the following steps:
- Create a new backup or edit an existing one.
- Click on the entry in the upper register menu: Options
- Click on the title: Email notification
- Activate the checkbox: Send e-mail message
- A view with several input fields opens.
- Enter all necessary data and click on Test.
General
You can activate the e-mail notification for each backup task. This sends an e-mail to the specified e-mail address and notifies you either about success, failure or just about a complete execution of the backup task.
Encryption
It is important for the settings that you select the correct encryption. Not all e-mail servers automatically send the accepted encryptions to the program, so the program can not automatically pick one for you. You have to explicitly choose SSL or TSL, but only if the server supports encryption.
Examples
Email address : max.muster@gmail.com
Server: smtp.gmail.com
Port: 587
Encryption : TSL
T-Online Mail
Email address : max.muster@t-online.de
Server: securesmtp.t-online.de
Port: 587
Encryption : TSL
Live-Mail / Hotmail / Outlook
Email address : max.muster@live.de oder max.muster@hotmail.com
Server: smtp.live.com
Port: 587
Encryption : TSL
GMX
Email address : my-mail-name@gmx.de oder my-mail-name@gmx.net
Server: mail.gmx.net
Port: 587
Encryption : TSL
Attach reports
In addition to basic information about the task, you can append the entire report to the e-mail. Then you have in the report all of the important details at hand, you possibly interested in.
Multiple recipients
You can send the e-mail notification to several recipients by entering a semicolon in the E-mail eecipient field for the e-mail addresses of all recipients.
Example
freund@hotmail.com; test@web.com
Compression of data
Information about the used compression algorithms, their applicability and scalability and the comparison of these for data backup.
Using data compression can reduce the size of backed up files, so they use less storage space.
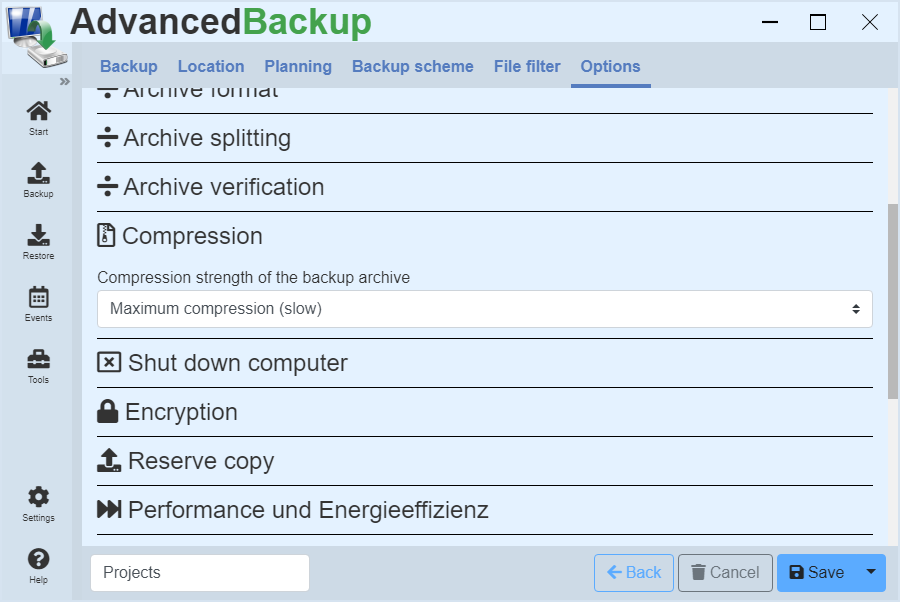
You can enable compression of data by following these steps:
- Create a new backup or edit an existing one.
- Click on the entry in the upper register menu: Options
- Click on the title: compression
- A selection field opens.
- Here you can select how intensively the data should be compressed.
Algorithms
In the application, three different compression algorithms available :
- Speed LZ: About four times as fast as Deflate, good compression
- Deflate: About twice as fast as LZMA, good compression
- LZMA: About 10-20% better compression than Deflate.
Application
The speed LZ compression algorithm is oriented to speed. He uses little processor power and can quickly compress large amounts of data reliably and without loss. It is suitable especially for older computers with limited performance.
The deflate compression algorithm is widespread and known from the popular ZIP archive. He is repeatedly tested and provides a solid foundation for a safe compression. His balance between speed and compression strength makes it ideal for use on modern computers.
If you must save space and have much computing power, then LZMA is a good algorithm. Are there enough processor cores available, these can separate the data and reach for higher speeds. However, the LZMA algorithm takes about twice as long as Deflate.
Scalability
All compression algorithms on existing cores can be scaled by dividing the amount of data to be compressed, so a processor with eg.: 16 cores, a speed increase of up to 1600% is possible. In reality, the growth will be somewhat lower, however, since it lost time by synchronizing the cores.
Archive verification
The backup software offers the possibility to check the created backup archives from the program either manually or automatically for functionality and report any detected errors.
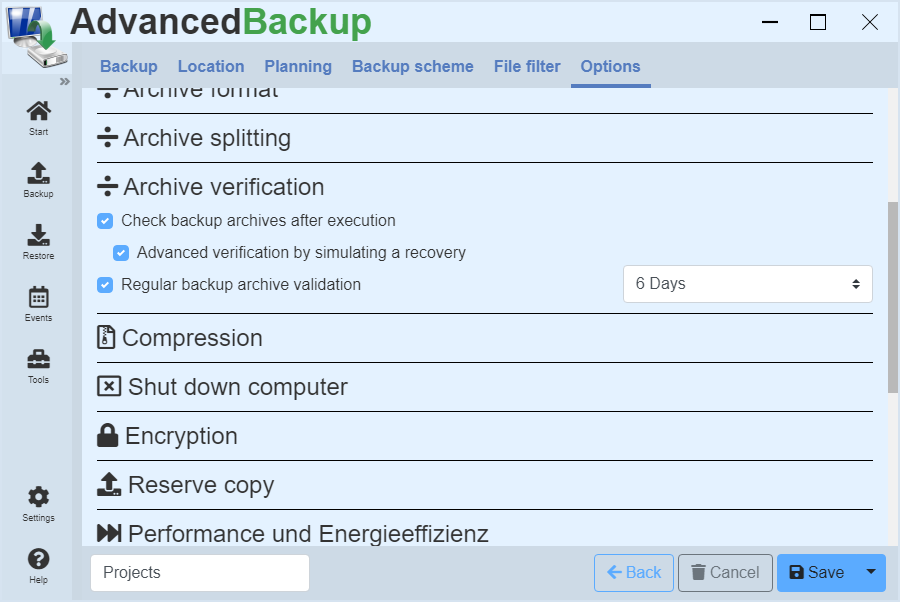
General
In general, a distinction is made between two types :
- Validation of the archive by checking the index entries: It will be counted through all content and the size of the archive is compared.
- Validation of the archive through a simulated recovery: All content is extracted from the backup archive and compared using a checksum.
Archive validation of a drive backup
In the validation the data will not be re-read from the hard disk, but from the backup archive are extracted and compared with a in the backup created checksum (CRC32, MD5 or SHA1). Which checksum is used for control, can be selected in the backup settings.
Archive validation of a backup
In the validation the data will not be re-read from the hard disk, but from the backup archive are extracted and compared with a in the backup created checksum (CRC32, MD5 or SHA1). Which checksum is used for control, can be selected in the backup settings.
Automatische Validierung
When creating a backup, a backup archive can be directly validated after the backup process. The success of the backup is ensured immediately. If errors occur during validation, they are written to the report and the user is informed about the failure of the validation.
A backup archive can also be validated regularly, at selected intervals or after the data backup. If an error occurs during validation, the user is also informed.
Manual execution of a validation
About the Explorer
You can validate a backup from Windows Explorer by navigating to the location of the archive in the Explorer and select the backup archive.
- Right click on the file
- Submenu: Advanced Backup
- Menu item: Validate archive
It is immediately carried out a rapid validation by checking the index entries.
About the program
Open the archive dialog via :
- Go to main menu click on menu item: Restore
- The view lists all backup archives.
- Search and display all archives
- Click on the last gray button in the command bar. A drop-down menu opens.
- Click on the menu item: Check archive
- The archive check starts immediately and displays the result.
It is immediately carried out a rapid validation by checking the index entries.
Backup user account
The backup can be run under a different user account if only certain users have access to the files or special administrator rights are required.
The software performs the regular backups under the local user account of the system. A different user account can be specified to perform the backup tasks. For this you need any user account with administrator privileges. It may be the central administrator account or another backup user account with administrator privileges.
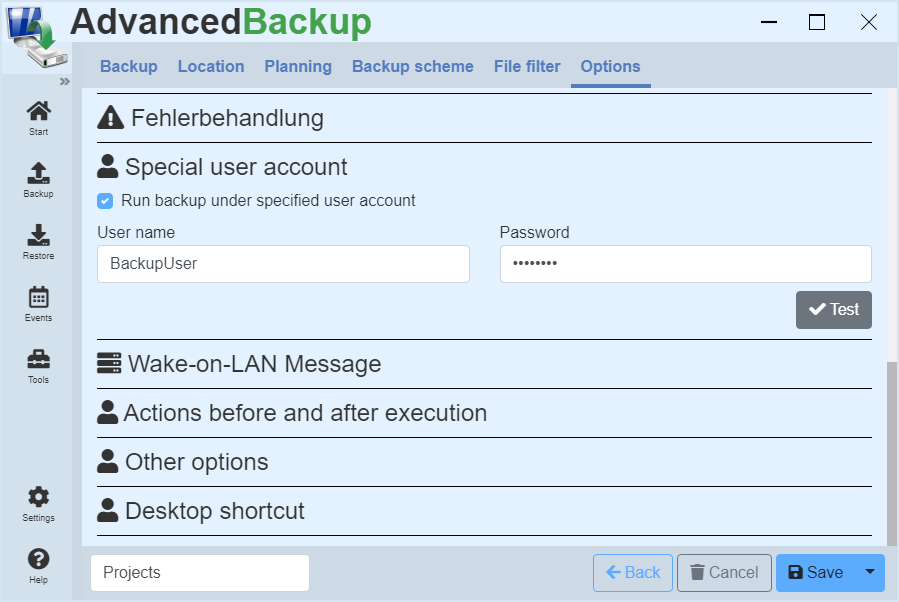
To execute a task with Administrator privileges, please proceed as follows :
- Start or open the program.
- Create a new backup or edit an existing one.
- Click on the entry in the upper register menu: Options
- Click on the title: Special user account
- A new view opens.
- Activate the checkbox: Run backup under specified user account
- Enter the user name and password of the user account with administrator privileges, under which the program will perform this task.
- Enter all necessary data and click on Test.
- Save the task and then start it. The program will automatically login the user and perform the task.
Run backup as a service
The software performs the regular backups under the local user account of the system. You don't have to do anything else, just create the backup task and start it.
Backup-Optionen
In den Aufgaben-Optionen kann die Ausführung der Backup-Aufgabe beeinflusst werden. Der Reiter Optionen enthält eine Übersicht aller konfigurierbaren Aufgaben-Optionen.
Aufgaben-Optionen :
- Informationen zur Backup-Aufgabe
- Backup comment
- Sicherheitsrichtlinien und Datenströme
- Notifications
- E-mail message
- Backup report
- Archive format
- Archive splitting
- Archive verification
- Compression
- Shut down computer
- Encryption
- Reserve copy
- Performance and energy efficiency
- Shadow copies
- Error handling
- Special user account
- Wake-on-LAN
- Actions before and after execution
- Other options
- Desktop shortcut
Restore data
This chapter deals with how to restore a backup. In the various instructions, you will learn how you can restore your data and what you need to consider.
Introduction to data restore
The program can restore the data you backed up previously. This you can restore either back to the original disk or to any other one. The manual contains, for each of the backup instructions on how to restore the backup.
Automatic Recovery
The fastest way to perform a restore, is to select the automatic restore. During automatic recovery, the program takes the configuration and restores the data to the original disk.
Recovery from the recovery environment
In some cases, it is required that the recovery is executed in the recovery environment. For example, if a system backup is to be restored. In this case, you must switch to the recovery environment before restore. See Recovery environment . Depending on the recovery, the software will automatically suggest you to restart in the recovery environment.
Search Backup Archive
Backup archives do not need to be tracked yourself. You can search for these and display clearly.
By the capabilities of the software, you must not search for backup archives, but you can let search for them :
- Start the program or open the program interface.
- Go to main menu click on menu item: Restore
- Click the button in the lower left view: Browse the computer
- The program searches all drives and lists all found backup archives.
- Click on the last gray button in the command bar. A drop-down menu opens.
- Then click on in the menu: Open archive
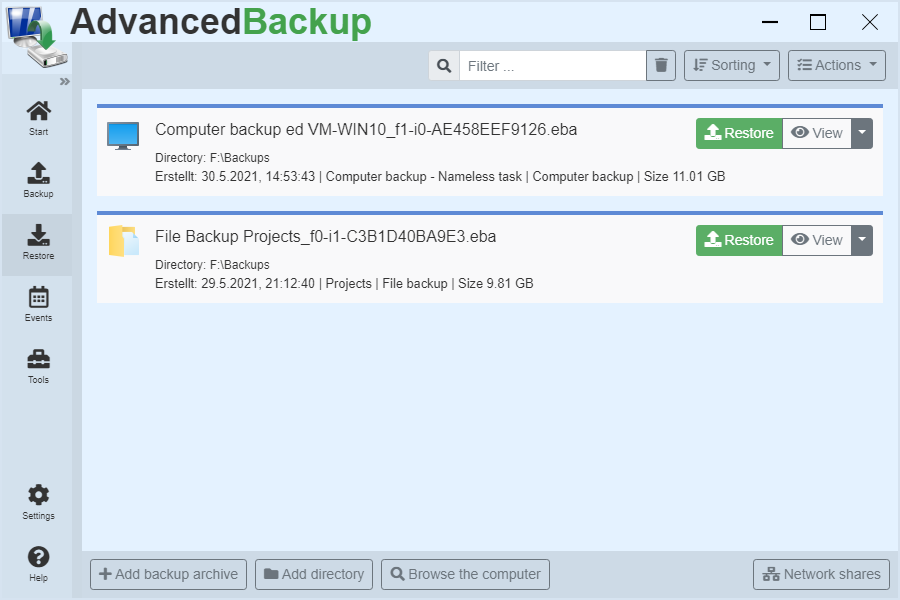
Open backup archive
Below you will find instructions on how to restore a specific backup archive.
If you want to restore a specific backup archive, and know where it is stored, click :
- Start the program or open the program interface.
- Go to main menu click on menu item: Restore
- Click the button in the lower left view: Add backup archive
- Then a dialog appears that allows you to navigate to the backup archive and open it.
- Navigate in the displayed window and choose the backup archive for restore.
- After opening, the backup archive is added to archive management.
- If you click Restore in Archive Management, the entire contents of the backup archive will be restored back to the original location.
- Click on the last gray button in the command bar. A drop-down menu opens.
- Then click on in the menu: Open archive
Restore from the task list
Quickly start a restore from the to-do list.
Do you have a backup just created, or is the task of a backup in the task list and the backup archive has not been moved, so you can start a recovery from the task list :
- Start the program or open the program interface.
- Go to main menu click on menu item: Backup
- Click the button: Restore
Now you can perform the desired recovery.
Restore files
Make it easy for you to restore your backups of files and folders from different archives. Three different targets for the recovery help you, to get quickly available your files.
Open the recovery window using one of the two methods described below :
As soon as you see the window to restore, you can start the recovery.
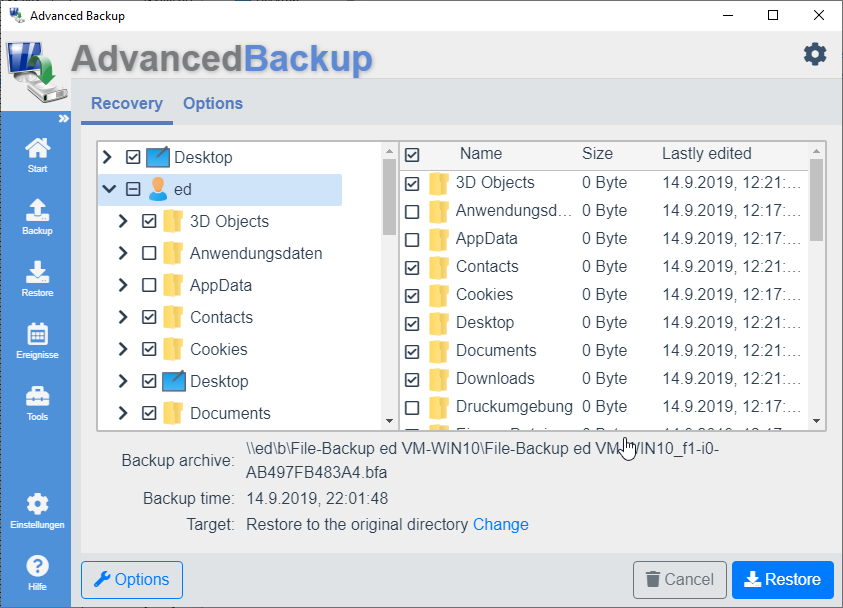
To restore files and folders, simply select the desired files in the tree structure and mark them with the checkbox. Once you have selected all required files, you can now set target of recovering.
Original location
With the Original location option, the files are restored to where they were originally read.
Example : A file backed up from (C:/Test/Ordner/MyFile.dat) will also be restored to (C:/Test/Order/MyFile.dat).
Different directory
In addition, a backup can also be restored to any directory.
Example: A file saved by (C: /Test/Ordner/MyFile.dat) is restored to the directory (D:/Recovery/Folder). The result of the restore is (D:/Recovery/Folder/C_/test/folder/myfile.dat). The directory structure is maintained in subdirectory.
If you want to specify a different directory for the recovery, click the button: Change Then select the option: To another directory Enter a path or select a directory using the button: Choose
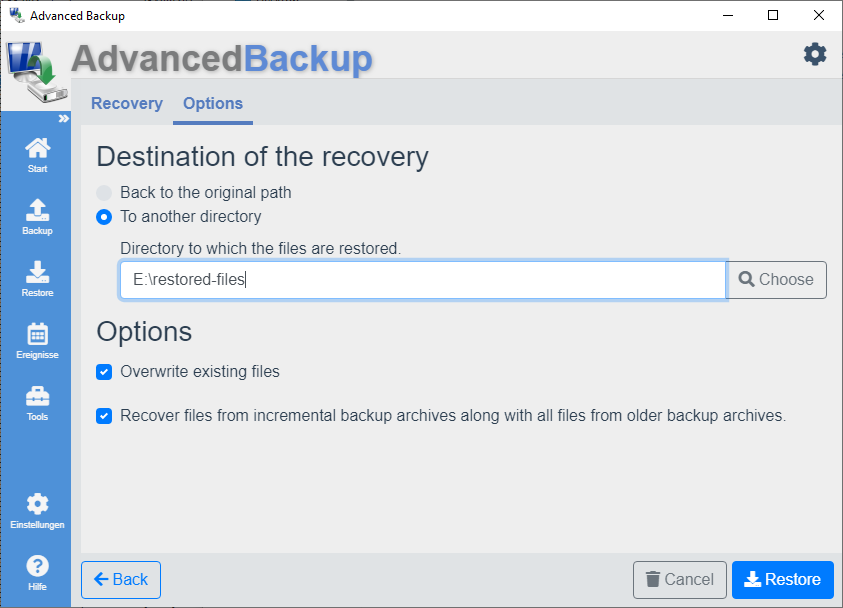
Incremental recovery of partial backups
The archive format (*.bfa) can combine partial backups with the associated full backups during recovery. This option is enabled by default. You can disable this option if you do not want this feature.
Option: Overwrite existing files
By default, the overwrite option is enabled. You can disable this option to restore only those files that are missing in the target directory.
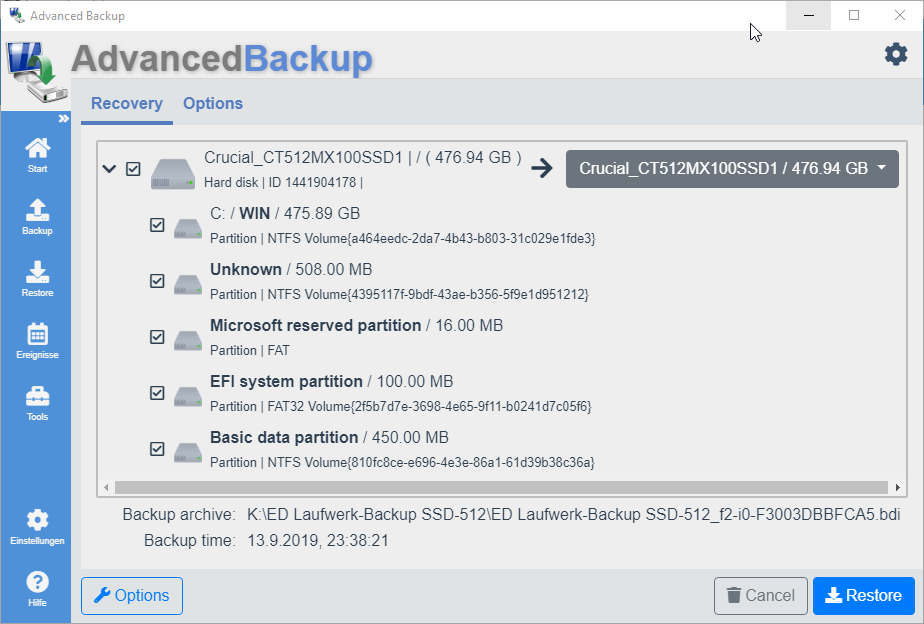
Restore of drives
Restore your drive backups on drives or hard drives. Take care not to overwrite important data.
Open the window for restore by one of the three ways described :
As soon as you see the window to restore, you can start the recovery.
- The view lists the hard disks and drives contained in the backup archive.
- The hard disks can be opened using the left arrow so that the partitions contained on this hard disk are displayed.
- Put the checkbox in front of the disks or partitions you want to recover.
- After setting the checkbox, selection fields for the target of the recovery appear to the right of the entries.
- The check boxes are already preselected with the original hard disk or partition.
- In the drop-down menu, you can select another hard disk or partition as the target of recovery.
- Once you have chosen a destination for recovery to any desired drive, you can click Restore button to start the recovery. All drives will be restored one after the other.
Disk management you will find under: Computer Management - Data storage - Disk Management.
Sector alignment
When choosing the hard drive to restore, you need to make sure that new hard drive supports the same sector alignment as the old one. Modern hard drives support both. Older hard disks only 512. If you restore a backup of your hard disk with a 4096 alignment on a hard disk with 512 alignment, the hard drive may not be bootable.
Restore hard disk
See section: Disk recovery
Restore computer
A computer backup can be restored in a few steps. You have two options for this.
- Recovery from Task Management: This restores the last backed up state.
- Recovery from Archive Management: You can select a time and restore the backup archive.
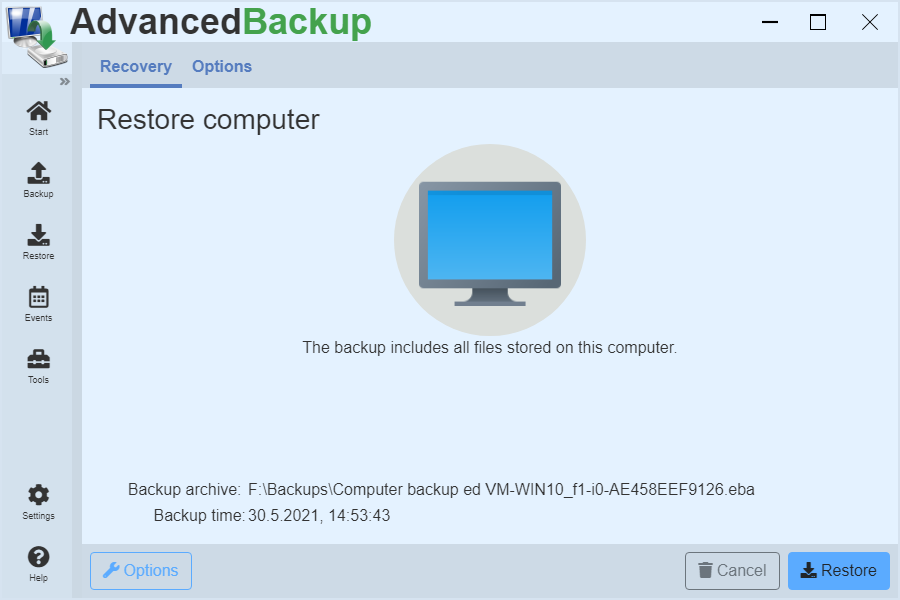
Recovery from Task Management
- Start the program or open the program interface.
- Go to main menu click on menu item: Start
- A list of all backup tasks will then appear
- Click on: Restore
- The backup archive of the computer backup is opened.
- Click again: Restore
- Then click on : Restart and Restore
The computer restarts in the recovery environment and restores the backed up data from the backup archive for you. Once the process is complete, the computer restarts.
Recovery from Archive Management
- Start the program or open the program interface.
- Go to main menu click on menu item: Restore
- A list of all backup archives will then appear
- Click on: Restore
- The backup archive of the computer backup is opened.
- Click again: Restore
- Then click on : Restart and Restore
The computer restarts in the recovery environment and restores the backed up data from the backup archive for you. Once the process is complete, the computer restarts.
Open and check archive
The program offers different possibilities to open a backup archive and to check the files contained.
Open a backup archive a file and folder backup
Open from Windows Explorer :
- Navigate inside Windows Explorer to the backup file
- Double-click on the blue backup file
- A window opens with files listed (Top left is a tree structure; on the right the files of the choosen folder are listed )
- Navigate in the tree to the desired file
- Put a checkmark in front of the desired file
- Select a path for the recovery
- If desired, you can recover the file now
Open from the program :
- Go to main menu click on menu item: Restore
- The view lists all backup archives.
- Search and display all archives
- Click on the last gray button in the command bar. A drop-down menu opens.
- Click on the menu item: Open archive
- It is again a tree structure
Open backup archive of a drive backup
Recommended: Open from Windows Explorer :
- Navigate inside Windows Explorer to the backup file
- Double click the red backup file (With the extension *.bdi)
- A window with the drives opens
- Click on the appropriate drive
- Browse the folders on the desired file
Open from the program:
- Go to main menu click on menu item: Restore
- The view lists all backup archives.
- Search and display all archives
- Click on the last gray button in the command bar. A drop-down menu opens.
- Click on the menu item: Open archive
File synchronization
Synchronize your files and folders between different local directories or network shares.
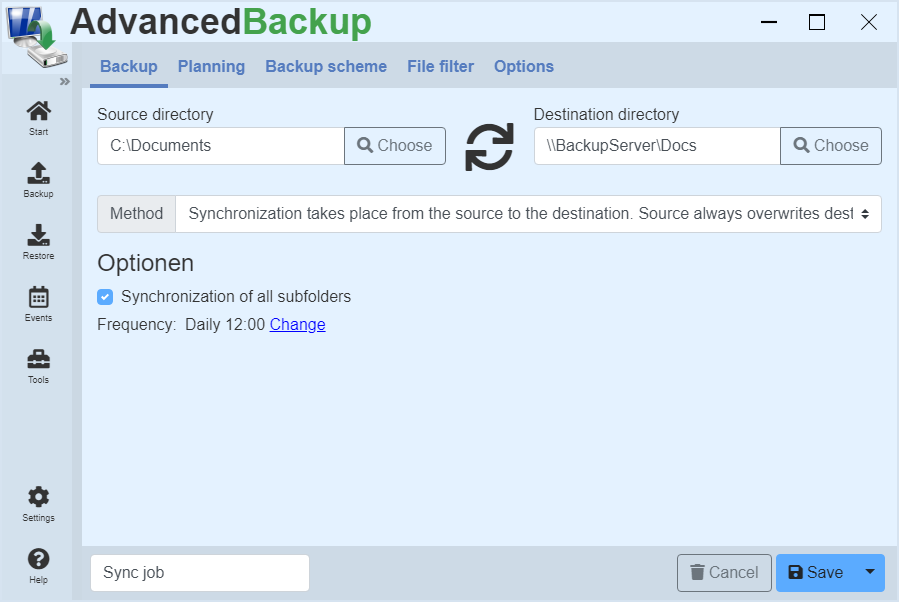
Synchronize files
The synchronization of files is easy:
- Select the desired source directory in the left input field.
- Select the desired target directory in the input field on the right.
- Then save the synchronization with the Save button.
- Now the new task can be started in the task management.
Synchronization method
Synchronization from source to destination :
Source always overwrites destination
All the files in the source folder are copied to the destination folder. If files with the same name are included, they will be overwritten.
Synchronization from source to destination :
Source overwrites destination, if the source more up to date
All the files in the source folder are copied to the destination folder. If files with the same name exists, they will be overwritten only if the files are in the destination folder are more up to date, e.g.: were changed later as the files in the source folder.
Synchronization from the target to the source
All existing files in the destination folder will be copied into the source folder. Always.
Merge
Die Zusammenführung erfolgt in zwei Schritten. Zunächst werden alle vorhandenen Dateien aus dem Quellverzeichnis in das Zielverzeichnis kopiert. Falls Dateien mit gleichem Namen existieren, dann werden diese verglichen und die aktuellere übernommen. Im zweiten Schritt werden anschließend alle im Zielverzeichnis vorhandenen Dateien in das Quellverzeichnis kopiert. Abschließend haben beide Verzeichnisse den gleichen Inhalt.
Displacement
All the files in the source folder are copied to the destination folder and deleted in the source folder.
Deletion
All existing files in the source folder will be deleted.
Mirroring
Bei der Spiegelung werden Dateien aus dem Quellverzeichnis in das Zielverzeichnis kopiert. Danach werden im Zielverzeichnis alle anderen Dateien gelöscht, die im Quellverzeichnis nicht existieren. Damit wird sichergestellt, dass das Zielverzeichnis immer den gleichen Inhalt hat wie das Quellverzeichnis.
Options for the synchronization
Synchronization of all subfolders
This option includes all subfolders in the target folder for synchronization.
Cloning of drives
Clone drives or even entire hard disks to another medium.
Cloning drives
This function offers you the possibility to create an exact copy of a drive. Here the source drive is copied sector by sector to the destination drive. Here is strictly copied sector by sector, if the option "Exact clone" is enabled. On the destination drive, the file system can be resized later using the disk management. The prerequisite for the cloning of a drive is that the destination drive is at least as large as the source drive.
Cloning of hard drives
Cloning a disk, the program creates an exact copy of the source disk to the desired destination disk. Here too, data is strictly copied sector by sector when exact clone is enabled. It is important that the destination disk is at least as large as the source hard disk, otherwise each sector can not be copied and there is a data loss. On the target drive, all the drives can be adapted to plants, and the file systems of the size later using the disk management.
Cloning to USB devices
USB disk on Windows systems, have the restriction that they may only contain one partition. If you try to clone an internal hard drive to an external disk, it may happen, that not all of the partition will be displayed.
If you want to create a clone of your system drive and this have to be bootable, you should connect the hard drive internally.
Options
Option: Exact clone
In the case of an exact clone of every sector of the hard disk is copied. The program takes no account of whether a sector is occupied with meaningful data or not. You have an exact copy at the end of the process. It is necessary that the target drive is at least as large as the source drive, otherwise each sector can not be copied and that can result in data loss. If the target drive is larger than the source, the unused storage space remains unused.
Option: Bootable clone
If the cloned hard disk should be bootable later, this option must be activated. The necessary start-up files for the system startup of the operating system are created on the cloned disk. To boot from a disk, it must be connected to the computer via an internal SATA, IDE or SCSI port.
Boot from external hard drive
A cloned OS can not be started on an external hard drive normally. Reason for this is that the required configurations are loaded in the original operating system too late. To be able to start a clone on an external hard drive, you need to configure this manually.
Starting from the clone
If you have created a bootable clone, you can start the operating system on this disk.
Start with BIOS
The BIOS of the computer can be used to determine from which hard disk to start first. To do this, you must restart the computer and change to the BIOS. Usually the keys F2 or DEL have to be pressed several times when starting the computer. Depending on the manufacturer, other keys may have to be pressed. The exact procedure is described in the computer operating manual. Once the BIOS is started, the boot order can be changed. After a restart, the computer should start from the cloned operating system.
Start at UEFI
In the UEFI of the computer, you can specify from which hard disk you want to boot first. To do this, you must restart the computer and switch to the UEFI. Usually the keys F2 or DEL have to be pressed several times when starting the computer. Depending on the manufacturer, other keys may have to be pressed. The exact procedure is described in the computer operating manual. As soon as the UEFI is started, you can select from the boot menu from which data carrier to be started. Select the clone, then the computer starts using the cloned operating system.
Recovery environment
Create a recovery environment so you can recover your data at any time in a small, isolated and independent Windows system.
The recovery environment is a small operating system that you can use in an emergency to restore your data in the event of a hard drive failure. This recovery environment can either be started internally from the program or externally from a disk: For example, CD, DVD, USB-pens or USB hard drives.
Restart to the recovery environment
The software can switch from normal execution to the recovery environment. There, backup archives and system backups can be restored.
To switch to the recovery environment, click :
- Go to main menu click on menu item: Tools
- Then click on : Start recovery environment
The program prepares the restart, and asks you for a confirmation.
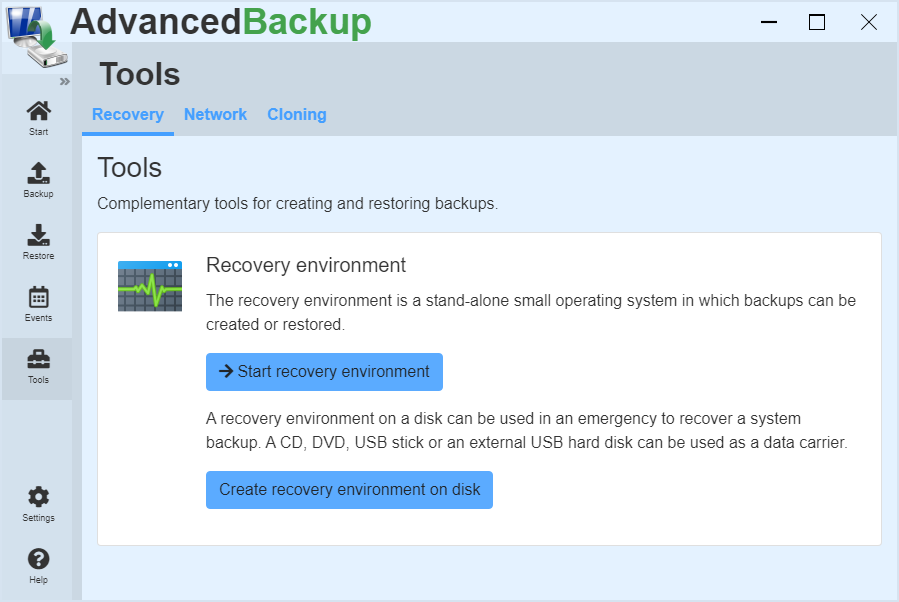
Create a recovery environment
To create an external recovery environment on CD, DVD, or USB, you must:
- Go to main menu click on menu item: Tools
- Click on: Create recovery environment on disk
- A new view appears.
Recovery environment on USB data carrier
If you want to create the recovery environment on a USB flash drive, follow these steps:
- Click on: Recovery environment on USB data carrier
- Select a USB disk from the drop-down list.
- Then click on : Create
- The backup software then begins creating the recovery environment.
Recovery environment on CD/DVD
If you want to create the recovery environment on a CD/DVD, follow these steps:
- Click on: Recovery environment on CD/DVD
- Select a CD/DVD burner drive from the drop-down list.
- Then click on : Create
- The backup software then begins creating the recovery environment.
After completing the recovery environment, it is advisable to check these for functionality, by making a restart and boot from the CD.
Important: To create a CD-based recovery environment, please do not use a rewritable CD or DVD. But CD-R instead of CD-RW and DVD-R instead of DVD-RW. The rewritable CD-RW and DVD-RW can not be started on some computers.
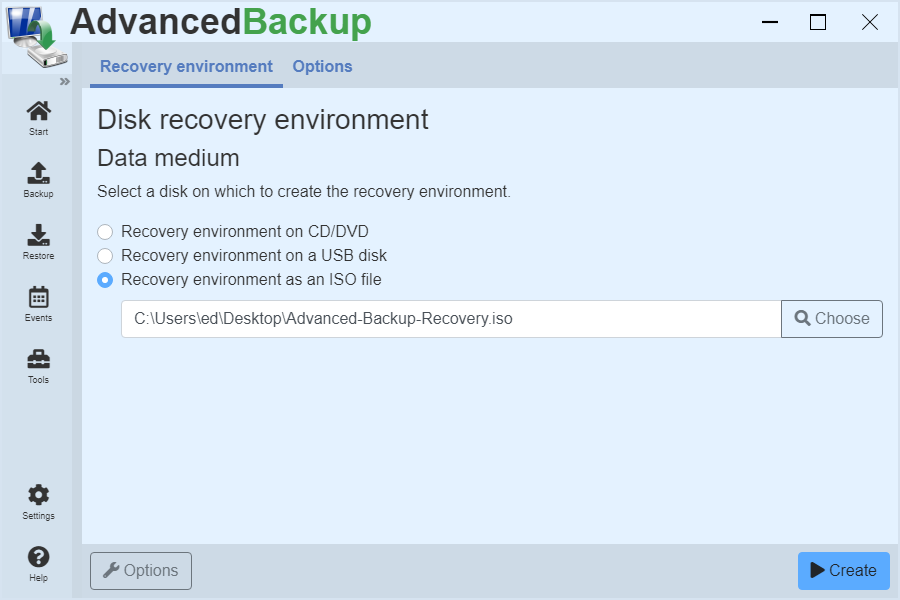
Recovery environment as an ISO file
If you want to create the recovery environment in an ISO file, follow these steps:
- Click on: Recovery environment to ISO file
- Select an ISO file to save to the recovery environment.
- Then click on : Create
- The backup software then begins creating the recovery environment.
Option: Additional drivers
Before the recovery environment is built, additional drivers can be included in the recovery environment. Under Options, specify a directory path with the driver files. The software recursively searches the directory path and loads all drivers into the recovery environment. These can be designed for different devices that are connected to your computer or another computer. Basic drivers for USB, monitors and networks are already included in the recovery environment.
Option: Own WIM
Before the recovery environment is created, a user-specific WIM image can be specified. The backup software uses the specified WIM image for the recovery environment and adds the required features.
USB stick or USB hard drive
After the preparation is complete, you need to connect a USB pen or a USB hard drive to the computer. In the last step you need to select this device now as target.
Please note that the USB pen is large enough. The required size is at least 1 GB. Aus Gründen der Kompatibilität sollte der USB-Datenträger eine Speicherkapazität von maximal 32 GB haben.
After successfully creating the recovery environment, it is recommended to test it on your own system. Some computer does not support booting from USB pens.
Test your starting capability of your USB pen, by connecting it and booting the operating system. At startup, you can by pressing certain keys as F12 or F8 come in the Start menu and select there the USB flash drive as the startup device.
Boot menu
The recovery environment of the backup software can be entered in the boot menu of the computer. This allows you to switch to the recovery environment via the boot menu when starting the computer.
Activate boot menu entry
After starting the backup software, the option can be activated under Settings.
- After starting the backup software, change to the settings.
- Activate the option by clicking on : Add entry to run the recovery environment from the boot menu
In addition, the duration of the boot menu display can be adjusted in the dropdown list displayed. The longer the boot menu selection is displayed, the longer the user has time to decide whether to start the recovery environment.
Deactivate boot menu entry
If the boot menu entry is no longer needed or the software is uninstalled, the boot menu entry must be deactivated.
- After starting the backup software, change to the settings.
- Deactivate the option by clicking on : Add entry to run the recovery environment from the boot menu
Additional informations
Network capability
The recovery environment already contains NIC drivers, and they are enabled when the recovery environment starts. If you have special network cards, which require a special driver, you must add these when creating.
Add additional drivers
Additional drivers can be integrated into the CD or USB recovery environment, which are then automatically loaded. The drivers do not have to be selected individually, but can be bundled into a directory where all drivers are contained. The program searches all files and subfolders in this directory and installs all appropriate drivers. It is important to note that when you use a Windows 7 64-bit installation DVD, also only 64 bit drivers are to be installed! The 32 bit drivers are simply ignored because they are incompatible with the recovery environment.
You can add as many drivers as you want to the recovery environment. They must not even be necessary for your computer.
Recovery environment without Windows installation DVD
Should a Windows Installation DVD is required and you do not have any, you can try a test version of the Windows DVD download from Microsoft. Search using a search engine for "Windows 7 Enterprise", "Windows 8 Enterprise" or "Windows 10 Enterprise". The download is performed as an ISO file, which you must integrate as a drive (either with the Windows own function or with other programs). You can then select this drive as the source in the Create Recovery Environment dialog.
Secure Boot
New UEFI system included techniques to protect the operating system, by preventing the start of unknown data devices. This technique is called Secure Boot. The recovery environment is normally compatible with Secure Boot.
In exceptional cases, if you can not start with the recovery environment, you may need to temporarily disable Secure Boot.
Use
Please make sure that you have a Windows license for your operating system and are authorized to use your operating system.
Personalize your recovery environment
If you want to personalize the recovery environment, you can do so by editing the following file.
C:\Program Files\Evorim\Advanced Backup\components\boot\winre.wim
The file is created automatically once you restart the backup software in the recovery environment. All changes are preserved and are used by the program. If you damage the recovery environment, you must delete it. The program generates in this case a new one.
Starting the Recovery Environment
Most modern computers and laptops, in order to shorten the startup time of the computer, usually have the configuration that you boot directly from the hard disk without searching for a boot CD. Each computer / laptop has a so-called boot menu. This allows the selection from which device (hard drive, USB flash drive or CD) are to be boot. This is directly activated by a button, usually "F8" or "F12" at the beginning of the computer or laptop start. If you do nothing, the control is passed to the Windows boot menu. This is a boot menu too, but only to the selection of the operating system and not of the boot device.
If you do not know how to reach the boot menu on your computer, you can read this in the computer / laptop manual, go by search engine with your computer, laptop or BIOS name and description in search.
Extras
Licensing
You can activate the purchased license in a few steps and immediately unlock all features of the application. In case of loss, you can request your license key again.
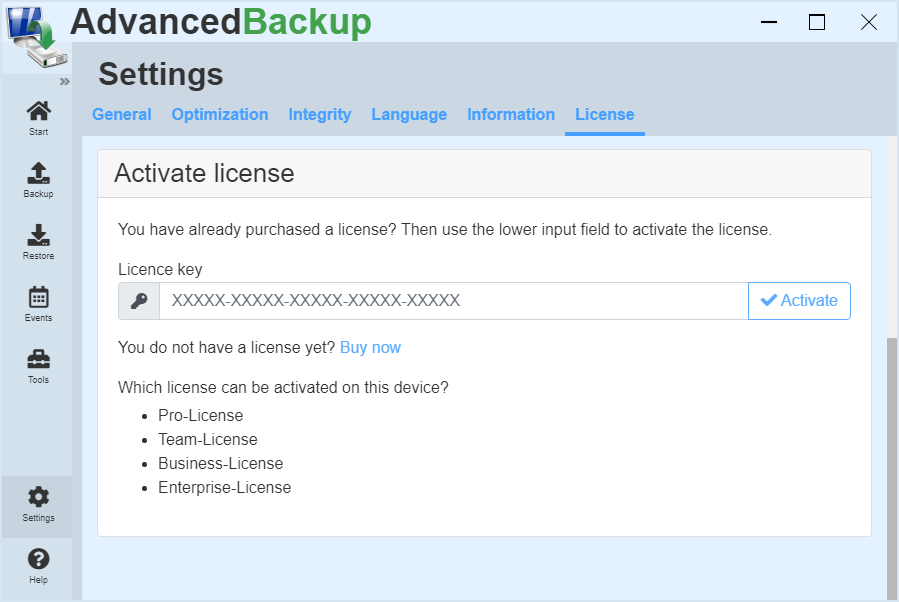
License activation
Once you have purchased a license for the software, you can activate this in the program. Complete the following steps:
- Start the program and wait until the program interface appears, or open it from the taskbar.
- Click on in the left main menu: settings.
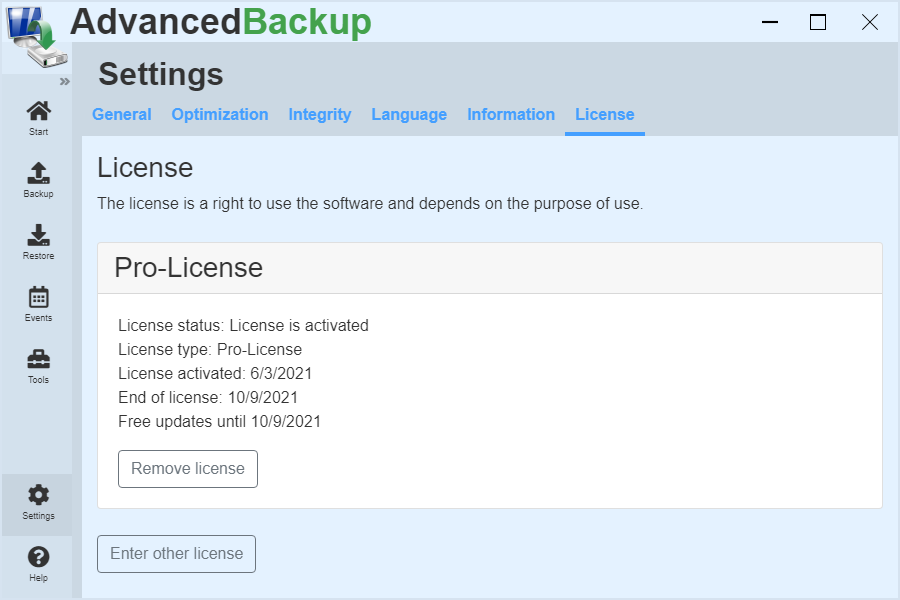
- Then click on in the upper register menu: License.
- At the bottom there is an input field with the title License key. Enter the license key there.
- If you then click the Activate button, the license is checked and unlocked on the system.
- A message appears indicating that the license is valid.
- Now you can use the unlocked features.
Remove license / Migrate license
If you want move the license to another operating system or computer, you can remove them from the current system.
- Start the program and wait until the program interface appears, or open it from the taskbar.
- Click on in the left main menu: settings.
- Then click on in the upper register menu: License.
- Click on: Remove license
- Now the license is removed and deactivated from the system
- Afterwards you can activate the license on a new system
Scope of license
Depending on the scope of the license that you have purchased, you must install the license key on the corresponding number of computers (client or server operating systems).
License lost
If you have lost your license key, you can request him again, through an informal e -mail or via the contact form.
License error
Should a license activation does not succeed or does not enable all the features included, you have to re-activate it.
- First, remove the current license.
- Quit the program.
- Start the program after 10 seconds again.
- Activate the license again.
Install updates
Here you can get information on how to upgrade your installed on a new version of the program and what you must observe.
The updating of the existing version of the program to a new one, you often gain additional features, changes and sometimes bug fixes.
Update software
To perform an upgrade, you must run the installation file in the installation directory.
There is a choice between: Updating or uninstalling the software. Select Update and click Next. Follow the instructions in the installation wizard that guides you through the entire process.
Alternative installation of an update
Alternatively, you can download the latest installation wizard from the download page and run them. See Download page .
- Open the download page.
- Download the desired new version appopriate for your operating system.
- Start the installation wizard.
- In appeared dialog select: Reinstall
- After clicking on Next, the new installation is started.
- After finishing the new version is installed.
Compatibility
When updating is important to note that not all versions are always compatible with each other. Information about an existing compatibility or incompatibility, can be found on the download page of the software. In this version history all changes are entered, which makes the versions incompatible with each other.
Note: To avoid compatibility issues, it is advisable to always create backup archives of your important data after performing an upgrade.
Problem cases
In rare cases, problem after an update to a new version can appear. These problems are often due to an incomplete update files. Some systems do not allow the installer, to conclude the necessary exporting files before upgrading. When these are used, they can not be changed, and the upgrade fails. In this case, you must uninstall the program completely, shut down the computer, and then re-install the new version.
Install earlier versions
All releases from the last 2 years are available for download on the product page. Product page: In the Downloads section. Select an older version of the software from the list and download it. Before installing an older version, you must uninstall the latest version of the software. When installing an older version, the two options must be deactivated:
- Express installation
- Check for updates
Uninstallation
Instructions on how to uninstall the program. The uninstallation process removes all of the software components of the application from your system.
Follow the steps below to uninstall the application:
- States the installation / deinstallation wizard in the application folder. This offers you as option to deinstall the software. Select the option and click on Next.
- At the end of the uninstallation make a restart of your system. This is necessary in order to remove all files that are integrated into the system during operation and can not be deleted during operation.
- After the restart, all files are completely removed and the folder is deleted.
Note
A complete uninstallation can be achieved by restarting the computer/server after the uninstall process, as indicated by the uninstallation program at the end of the uninstallation. This is necessary to remove all of the files that are integrated into the system during operation and can not be deleted during operation. Some components would lead to instability of the current system, if the removing of this one is forced. A simple uninstalling and immediate installation will not suffice if a component can not be removed in operation.
Uninstall manually
All running software components are located under:
- C:\Program Files\Evorim\Advanced Backup
- C:\Users\User name \AppData\Roaming\Evorim\Advanced Backup
By deleting this folder, all files are removed.
Command line
The program has features that can be accessed from the command line without start the program completely.
Execute via desktop shortcut
The backup tasks can be started via a desktop shortcut. This can be created in the options under the title Desktop shortcut.
- Start the program or open the program interface.
- Go to main menu click on menu item: Start
- Find the task you want to edit.
- Click on the last gray button in the command bar. A drop-down menu opens.
- Then click on edit in the menu.
- Click on the entry in the upper register menu: Options
- Click on the title: Desktop shortcut
- Click on: Create desktop shortcut
Executing a task
Um eine beliebige Aufgabe zu starten, müssen Sie den nachfolgenden Befehl verwenden:
Syntax
backupsvc.exe /task=%taskId%
%taskId%:
Die Identifikationsnummer der Aufgabe, die gestartet werden soll. Diese finden Sie in den Backup-Optionen einer Backup-Aufgabe. [
Backup-Aufgabe bearbeiten >
Reiter Optionen >
Abschnitt: Aufgaben-Optionen >
Aufgaben-Kennung ]
If you append the parameter "/wait", the program does not close until the task is finished.
Example
C:\Program Files\Evorim\Advanced Backup\backupsvc.exe /task=658794 /wait
Soll während der Ausführung einer Backup-Aufgabe zusätzlich die Benutzeroberfläche angezeigt werden, dann nutzen Sie nachfolgende Kommandozeile.
Syntax
advbackup.exe /task=%taskId%
Example
C:\Program Files\Evorim\Advanced Backup\advbackup.exe /task=658794
Damit während der Ausführung ein Statusfenster mit dem Fortschritt angezeigt wird, müssen Sie dieses in den Aufgabeneinstellungen aktivieren.
Remark: In the command line, you can both .
Tip: You'll quickly receive a correct command line ,
- By going to the task list ,
- Right-click on the desired task click ,
- Select the context menu "More" and then "Create desktop shortcut" button.
The program creates a correct, valid and functional command line in the shortcut that you can copy to use this for example in the Task Scheduler.
Run an entire group
To start any group, you must also use the command "run" :
Syntax
/run:"%GROUPNAME%"
The variable %GROUPNAME% is the name of a group that is to be started. These can be found under the task settings of the task, under the menu item "General", at bottom.
If the command "autoclose" is attached, the program is closed automatically after the task is finish.
Example
C:\Program Files\Evorim\Advanced Backup\backupsvc.exe /run="Images " /wait /ui
Validate a backup archive
All backup archives created with the program, as BDI, BFA and ZIP can be validated via the command line. The success of the validation is shown in a small information window.
Syntax
/validate /file:"%Path%"
The variable %Path% contains the complete path to a file. For instance: C:\folder\backup.bdi
If the command "autoclose" is attached, the program is closed automatically after the task is finish.
Example
C:\...\Advanced Backup\backupsvc.exe /validate /file="C:\folder\backup.bdi"
Restoring a backup archive
All backup archives created with the program BDI, BFA and ZIP can be initiated for restore from the command line. It opens the restore dialog that asks for further information.
Syntax
/restore:"%Path%"
The variable %Path% contains the complete path to a file. for instance: C:\folder\Sicherungsarchiv.bdi
Example
C:\...\Advanced Backup\backupsvc.exe /restore:"C:\folder\backup.bdi"
Task planning
You can use the Windows task scheduler to launch your tasks. In the task planning enter the task parameters and the task-identification.
C:\...\Advanced Backup\backupsvc.exe /run=15486524 /wait
Troubleshooting
Solution to frequent or recurring problems of users.
The PC is very slow out
The Software consumes few resources on an old computer also. If the performance of the backup suddenly become worse, the reason is the read operations of the hard disk. Reason therefore are defect sectors on the hard disk. For more information, see: "The perform of backup is suddenly stopped or runs very slowly".
Perform of backup is stopped suddenly or runs very slowly
In the case of a task which suddenly runs much slower, or even completely stops, so there is a very specific reason. The program has found an error in the hard disk and tries to reconstruct the sector with the help of meta data. This means that such an error can take a serious impact. In the process more sectors increasingly may be affected, and your valuable data destroy, without outwardly visible. You are viewing in the Explorer a file that is located on your hard drive. But what is displayed is only an Index object with key data such as name, size, modification date, etc. However, the actual content of the file is almost always on other sectors of the hard disk so that if you read the important file, you will find inevitably that this is possible.
What is to be done?? In any case, such a repair-backup need to run until it is finished ! Thereby the affected sectors are either repaired or, if the physical damage is advanced too far, the content is being reconstructed and stored in the backup archive. This gives you the opportunity to restore the data at any time .
Network drives are not displayed
If you are not able to select network shares, try including your network drives before starting the software.
Error message : "There is not enough memory available "
The program tries to allocate a block of memory and fails.
Apparently, this memory requirement is to high for your system.
Error message : "Error writing to the backup archive "
This error occurs if the operating system reports that the write operation was not successful. This can have several reasons :
- On the target hard disk or in the target network storage is not enough space available, although the system has reported sufficient storage space before.
- The file system of the backup location has a limit for the maximum file size. This happens, for example, in the case of the FAT32 file system. This file system can only manage files with a maximum size of 4 GB. Trying to write a larger file, the operating system reports these error.
- The target device is unavailable or write-protected.
Error mounting archives as a drive or NTFS folder
A possible cause for the faulty mounting of a backup archive as a drive, could be a lack of access rights, e.g.: User Account Control. Also some of the firewalls prevent the communication between the various components, so that the mounting fails. In rare cases, the backup file is corrupted at one point.
Backup of files and folders is incomplete
Experience has shown that often a problem with the access permission exist: Either NTFS access rights/restrictions are set or the Anti-Virus denies the access to the contents, because the file might be infected.
Product support
If you came across a problem that you want to report, you can do this by describing the problem and further information to developers in order to resolve the problem quickly.
Detect errors
If you find that the application is not working as expected, you can submit a bug report. You need to remember about what you have done and how the program responded.
Report an error
You can report an error by:
- Use the contact form of the website ,
- Write an e-mail Or
- Post your review in Forum.
Important: Explain in detail the circumstances in which this problem occurs. This includes that you also describe exactly what you have done, what you wanted to achieve and how the software has responded. When possible, use a support package to speed up assistance.
Support package
- On the user interface of the program you will find the help button.
- When you click the button, a dialog proposing the creation of a support package.
- Click the button "Create support package".
- After you create the support package you will find this on your desktop.
- Send this file to support@evorim.com
Configuration files
In order to be able to find an error in addition to the error description is sometimes important to know exactly what settings have been set in the program. This requires the configuration files "tasks.json" and "settings.json" from the "data" folder in the installation directory. These you have to send by email to us.
Additional information
An error message should contain as much information as possible. Please enter in addition to your description of the fault, the following information:
- The software version used
- Operating system : (Windows XP / Windows Vista / Windows 7 / Windows 8 / 32 Bit oder 64 Bit)
- What type of backup it is about? (File / Folder -, Drive - oder Disk backup )
- Where is the backup location? (Local hard drive , External hard drive , Network drive , NAS- oder FTP-Server)
- What file systems do the drives have? (As far as this is known to you )
- What additional settings do you use? (Compression , Encryption , File - oder Folder -Filter )
FAQs
Is there a documentation or a manual?
Yes, an online manual and documentation can be found on this page under the menu item Documentation. There is also a manual as a PDF for download.
Where can I find updates for the program?
All current versions of this software can be found at the bottom of this web page.
Can this software backup used files?
Yes, the program can also backup files which are in use. To do this, you must enable the Volume Shadow Service option under Settings in the main menu.
Can I also backup the Outlook PST and OST files?
Yes, the program can backup databases and files which are just in used. (see above)
On which operating systems the program runs?
Windows 7, Windows 8, Windows 10, Windows Server 2012, Windows Server 2012 R2, Windows Server 2018, Windows Server 2018 R2, Windows Server 2016, Windows Server 2019
Can I run the program as a service?
Yes, the program can also be run as a service and started by the service manager.
Can I run the program under a different user account?
Yes, the program can also be run under a different user context.
Can I use the program with the Windows Task Scheduler?
Yes, the program can be used via a command line interface to execute tasks. For more detailed information, please refer to the manual.
Where can I buy the Professional Edition?
In our webshop. See : Webshop
Where can I downloaded the latest version?
Where can I find what new features have been added?
In the download area of the respective version. See : Entwicklung und Download
The license key got lost. What can I do?
Schreiben Sie uns eine formlose E-Mail mit Ihrem Namen und geben Sie die E-Mail-Adresse an, die Sie bei der Bestellung verwendet haben.
Can I control the program via the command line?
Yes, you will find detailed instructions in the manual. See : Command line
How can I create a recovery environment?
Yes, you will find detailed instructions in the manual. See : Recovery environment
Can each user account on a computer use the licensed software?
Yes, an activated license of the software on a computer includes all of the user accounts. Each user can use the licensed software.
Is an installation on a computer without Internet possible?
Yes, the software can also be installed on a computer without an Internet connection.
Which telemetry data is captured and transmitted by the software?
We respect the privacy of our users and customers, therefore no personal data is transmitted. Geringfügige Mengen an allgemeinen anonymisierten Telemetrie-Daten werden durch die Software erfasst, wenn Sie die untenstehende Funktionen nutzen. These are listed below.
Update feature:
If you use the update function of the software, data will be transmitted during the update request to enable a secure and reliable update process. You can deactivate the update function.
Transmitted data are: Name of the software, version of the software and identification of the software
Can I back up my entire computer and recover on hard disk damage?
Yes, you will find detailed instructions in the manual. See : Complete system backup and restore
Kann ich meine alte Lizenz in der neuen Version nutzen?
Falls Sie eine Lizenz erworben haben, die Lifetime-Updates beinhaltet, dann können Sie die neue Version kostenlos installieren und mit Ihrer Lizenz aktivieren. Sofern Sie eine Lizenz mit zeitlich begrenztem Update-Recht erworben haben, ist entscheidend, wann die Lizenz erworben wurde. Wurde die Lizenz innerhalb der letzten 12 Monate erworben, dann können Sie kostenlos auf die neue Version aktualisieren. Andernfalls müssen Sie für die neue Version eine neue Lizenz erwerben.
How well are the compression algorithms used capable of multithreading?
Basically, all the compression algorithms used are fully multithreaded, as the data to be compressed is split into parts and compressed by different threads in parallel. For this reason, a high number of threads makes sense for fast compression.
How can I install an older version of the software?
All releases from the last 2 years are available for download on the product page. Please read the instruction: Install earlier versions.
My license is not valid for the new version. What can I do?
You can install an older program version which can be activated with your license key. Please read the instruction: Install earlier versions.
How can I add additional programs to the recovery environment?
The recovery environment can be customized. Please read the instruction: Personalize your recovery environment